
Ever feel like your garden just needs a little boost? I know I do, especially when space is tight. These simple gardening bags can transform your planting experience.
Discover how they save space and help your green friends flourish.
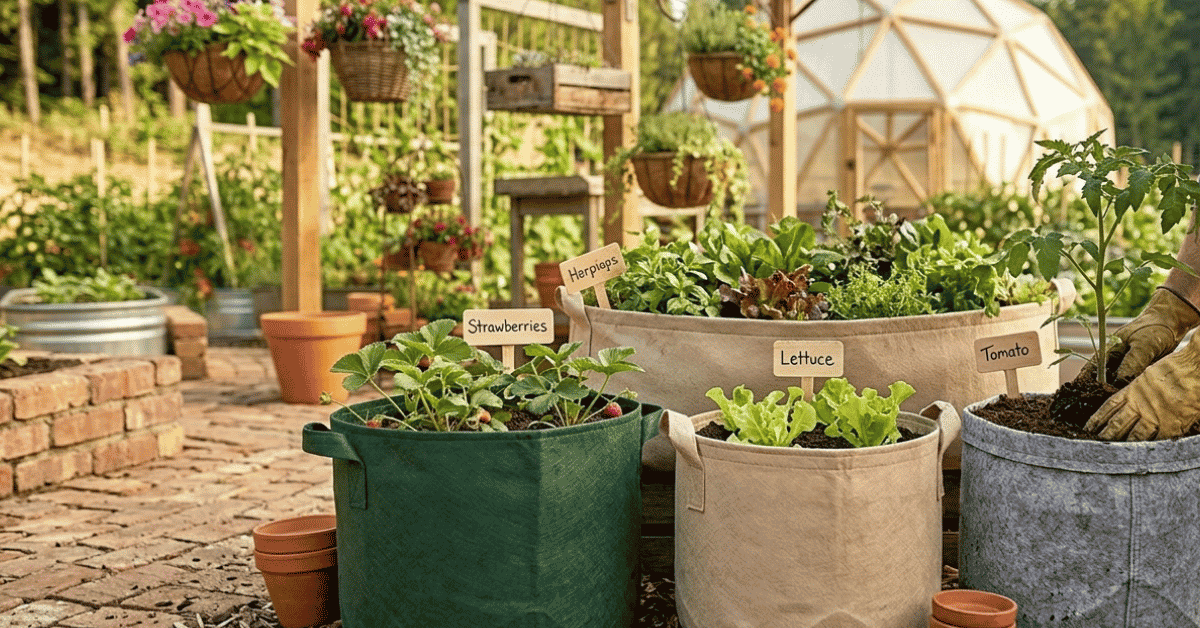
What Exactly Are Gardening Bags for Planting?
Gardening bags, often called grow bags, are just what they sound like: containers for planting. But they’re not your typical terra cotta pots. They’re usually made of fabric, like felt or a strong woven material.
This lets the roots breathe better. It also stops them from circling around the pot endlessly. I’ve used them a lot over the years.
They’re fantastic for folks with small yards or even just a sunny balcony. They’re lightweight, easy to move, and come in all sorts of sizes.
Why Choose Gardening Bags Over Traditional Pots?
Honestly, I reached for my first gardening bag out of desperation. My vegetable patch was getting crowded. Traditional pots felt so heavy and took up so much room.
Gardening bags changed that for me. They’re way lighter, which is a big deal when you’re lugging them around. Plus, that fabric means your roots get tons of air.
This prevents root binding. It’s a common problem with plastic pots. Root binding can really stunt a plant’s growth.
The drainage is also amazing. Excess water just wicks right through the fabric. No more soggy bottoms for my delicate seedlings!
This means fewer root rot issues, which was a huge win for my tomatoes last year. I also love how easily I can store them when the season is over. They just fold up small.
It’s a space saver and a back saver.
Types of Gardening Bags to Consider
There are a few main types of gardening bags. Each has its own perks. It really depends on what you’re growing and where you’re growing it.
Fabric Grow Bags (Felt and Woven)
These are the most common. They’re made from breathable fabric.
- Felt Bags: These are super popular. They’re soft and very breathable. They also offer good insulation. My potatoes loved their felt bags last summer. The soil stayed nice and moist.
- Woven Bags: These are often made from a stronger, more durable material. They can handle more weight and wear. I find these great for larger shrubs or even small trees I want to move around.
Recycled Material Bags
Lots of companies now make grow bags from recycled materials. This is a great eco-friendly option. I try to pick these when I can.
They often perform just as well as the virgin material ones.
Specialized Bags
You can also find bags made for specific plants.
- Potato Grow Bags: These have a flap at the bottom. It makes harvesting super easy. You just open the flap. The potatoes tumble out. No more digging!
- Aeration Pots: Some fabric bags are designed to maximize air pruning. They have even more holes or a specific weave.
Key Features to Look For in Gardening Bags
When I’m shopping for new gardening bags, I always check a few things. These make a big difference in how well they work.
Durability and Material Quality
You want a bag that will last more than one season. Check the stitching. Is it strong?
The fabric itself should feel sturdy. I’ve had cheaper ones rip when I filled them with soil. That’s a mess I don’t want again!
Size and Depth
This is crucial. Think about what you’re planting. Tomatoes need depth.
Root vegetables like carrots and potatoes need depth too. Herbs and greens can often do well in shallower bags. Most bags will state their capacity, often in gallons.
Handles
If you plan to move your bags, strong handles are a must. I’ve seen bags with flimsy straps. They can break under the weight of wet soil.
Reinforced handles are always a good sign.
Drainage and Aeration
This is the magic of fabric bags. Look for bags that clearly state they are breathable. The weave or felt should allow air to circulate freely.
This helps prevent waterlogging and promotes healthy root growth.
Color
While not as critical, color can matter. Darker colors absorb more heat. This can be good in cooler climates.
Lighter colors stay cooler in very hot weather.
Getting Started with Your Gardening Bags
Using gardening bags is pretty straightforward. It’s one of the things I love most about them. They make the whole process simpler.
Choosing the Right Spot
Before you even fill the bag, decide where it will live. Most plants need at least six hours of sunlight a day. Consider the mature size of your plant.
Will it get too much shade from a nearby fence or tree? Also, think about access to water. You’ll be watering these more often than in-ground plants.
Filling Your Bags
Use a good quality potting mix. Don’t just use garden soil. Garden soil compacts too much in containers.
It can suffocate the roots. I like to mix in some compost and perlite for extra drainage and aeration. Fill the bag, but leave an inch or two at the top for watering.
Planting Your Seeds or Seedlings
Follow the planting depth and spacing instructions for your seeds or plants. Gently place your seedling into the soil. Firm the soil around it.
Water thoroughly after planting.
Watering and Feeding
This is where you need to be a bit more attentive. Fabric bags dry out faster than plastic pots. Check the soil moisture daily, especially in hot weather.
Stick your finger about an inch or two into the soil. If it feels dry, it’s time to water.
Feeding is similar to other container gardening. You’ll likely need to feed your plants periodically with a liquid fertilizer. This is because nutrients can leach out faster with frequent watering.
Common Problems and How to Solve Them
Even with these fantastic bags, sometimes things go wrong. Here’s what I’ve run into and how I fixed it.
Overwatering
- Problem: Soil stays soggy, plant looks sad.
- Fix: Ensure your bag has good drainage. Don’t water on a schedule. Water only when the top inch of soil is dry. Let excess water drain away.
Underwatering
- Problem: Soil is dry, plant wilts.
- Fix: Check soil moisture daily, especially in heat. Water deeply until it runs out the bottom.
Nutrient Deficiencies
- Problem: Leaves turn yellow, stunted growth.
- Fix: Use a balanced liquid fertilizer every few weeks. Follow the product’s instructions.
Pests
- Problem: Bugs are munching your leaves.
- Fix: Inspect your plants regularly. Use organic pest control methods like neem oil or insecticidal soap if needed. The good airflow from the bags can sometimes deter pests. I found this simple gardening hack really helped with aphids on my kale: this simple garden hack saved my plot.
Comparing Gardening Bags to Other Container Options
It’s helpful to see how gardening bags stack up against other common container choices.
| Feature | Gardening Bags (Fabric) | Plastic Pots | Terracotta Pots |
|---|---|---|---|
| Breathability | Excellent (air pruning) | Poor (can lead to root circling) | Good (pores allow some air/water) |
| Weight | Very Light | Light to Medium | Heavy |
| Drainage | Excellent (water wicks through) | Good (depends on drainage holes) | Excellent (highly porous) |
| Durability | Good (can tear with rough handling) | Good (can become brittle in sun) | Fragile (can chip or break easily) |
| Cost | Moderate | Inexpensive to Moderate | Moderate to Expensive |
| Portability | Excellent (lightweight, foldable) | Good (can be heavy when full) | Poor (heavy and awkward) |
| Insulation | Moderate (felt can insulate well) | Poor (can get very hot in sun) | Good (clay helps regulate temperature) |
Creative Ways to Use Gardening Bags
I’ve found gardening bags are incredibly versatile. They’re not just for veggies anymore.
- Herb Gardens: Create a dedicated herb garden on your patio. It’s easy to grab fresh herbs when you need them.
- Flower Displays: Grow colorful annuals or perennials. You can group them to create stunning visual displays. I love using them for my petunias.
- Seed Starting: Larger bags can even be used as temporary, spacious seed-starting beds before transplanting. This gave me more room for my seedlings: this hidden dark secret changed my plot.
- Temporary Garden Beds: Redoing a section of your yard? Gardening bags offer an instant planting solution.
- Vertical Gardening: You can hang some smaller grow bags or stack them to create a vertical garden. This is amazing for tiny spaces. I’ve seen people use them along fences.
Maximizing Success with Your Bags
One tip I always share is to avoid letting them sit in a puddle. Even though they drain, sitting water can still be bad. I always put mine on small risers or gravel to ensure airflow underneath.
This has saved my crops from root rot more times than I can count. You can see how I keep my plants healthy here: this strange garden hack saved my crops.
Don’t be afraid to experiment with different sizes and placements. I’ve learned so much just by trying things out. My small backyard plot has been transformed thanks to these bags: this simple gardening bag made my backyard plot easy.
Frequently Asked Questions About Gardening Bags
Can I leave gardening bags out in winter?
Most fabric grow bags can withstand winter. Remove all soil. Clean them.
Store them in a dry place. Some may freeze and crack if left full of soil.
How often should I water plants in gardening bags?
Water when the top 1-2 inches of soil feel dry. This might be daily in hot, dry weather. It varies greatly by plant and conditions.
Are gardening bags good for tomatoes?
Yes, gardening bags are excellent for tomatoes! They promote healthy root growth and prevent root circling. Choose a larger, deeper bag for best results.
What is the best soil for gardening bags?
Use a good quality, lightweight potting mix. Avoid dense garden soil. Mix in compost or perlite for better drainage and aeration.
Do gardening bags get too hot?
Fabric bags offer better aeration than plastic. Lighter colors reflect heat. But, like any container, they can get warm in direct sun.
Placing them in partial shade helps.
Why do my plant leaves turn yellow in gardening bags?
This often means the plant needs more nutrients. Use a balanced liquid fertilizer. It could also be over- or underwatering.
Check the soil moisture first. Learn more about common plant problems.