
I’ve always dreamed of a garden that just… works. No weeds, no endless watering, just fresh greens right outside my door. Last spring, I finally got my hands on an aeroponic gardening tower and wow, it’s a game-changer!
This guide shares everything I’ve learned using it.
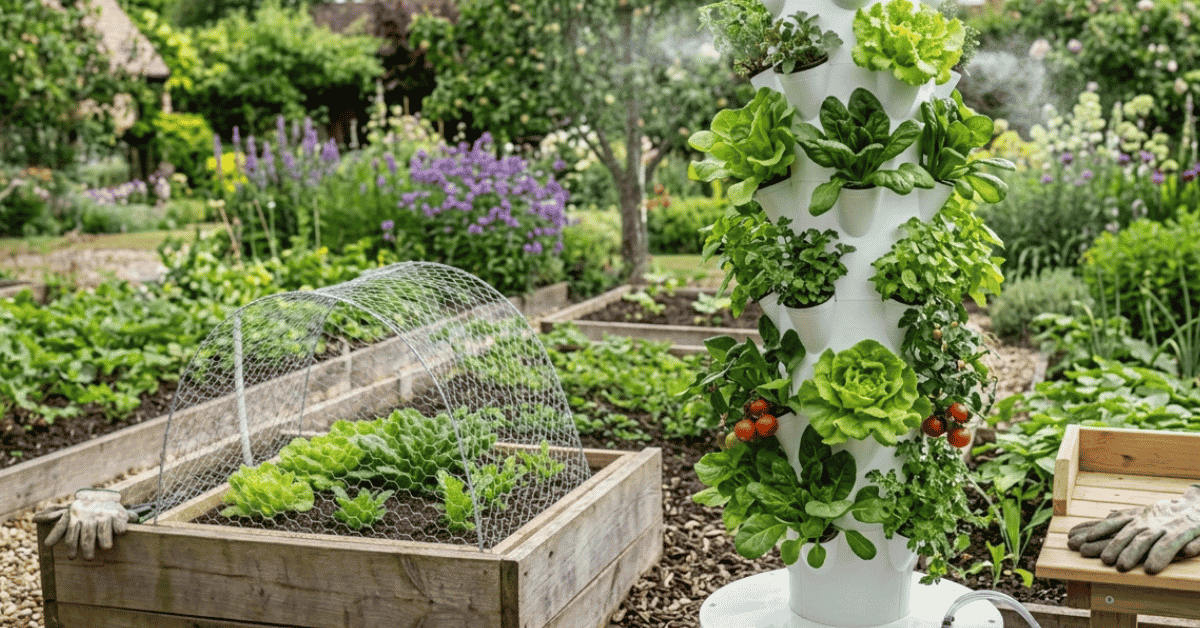
What is an Aeroponic Gardening Tower?
So, what exactly is this “aeroponic gardening tower” thing? It’s a clever system that grows plants without soil. Instead, it uses misted nutrient-rich water.
Your plants hang with their roots dangling. A special pump sends this watery food mix right to their roots. Think of it as a shower for your plant roots.
My first tower was a simple cylinder, but they come in many shapes now. I’ve seen some spiral upwards, others are stacked cubes. This method means plants get everything they need, super fast.
It uses way less water than traditional gardening. I was shocked by how much less. This is why I love it.
How Do Aeroponic Gardening Towers Work?
It’s pretty neat how these towers function. The main idea is delivering water and nutrients directly to the roots. Most towers have a reservoir at the bottom.
This holds your water and dissolved plant food. A pump in the reservoir sends this mixture up through tubes. These tubes then spray the water onto the plant roots inside the tower.
The excess water drips back down into the reservoir to be reused. It’s a closed-loop system, which is super efficient.
Inside the tower itself, you’ll find net pots. These hold your plants. The roots grow down from these pots.
They’re exposed to the nutrient mist. This misting happens on a timer. Usually, it sprays for a few minutes every hour or so.
This keeps the roots moist but also allows them to breathe. Air is crucial for root health, and this system provides it perfectly. I’ve found that checking the timer settings is key.
Too little mist, and the roots dry out. Too much, and they can get waterlogged. It took a little trial and error for me to find the sweet spot.
Components You’ll Find
When you get an aeroponic tower, you’ll see a few key parts:
- Reservoir: This is the base. It holds the water and nutrients. Mine is a sturdy plastic bin.
- Tower Body: This is the main structure. It has holes for your plants. It can be made of PVC, plastic, or metal.
- Net Pots: These little cups hold your plants and growing medium. They fit into the holes in the tower.
- Pump: This is the workhorse. It circulates the water.
- Misters/Sprayers: These attach inside the tower. They spray the nutrient solution onto the roots.
- Timer: This controls when the pump turns on and off.
The Science Behind It
The magic happens because roots need air and water. Soil can hold water, but it also holds air. Roots can get choked in soggy soil.
Aeroponics bypasses soil. It gives roots a direct hit of water and food when they need it. Then, they get air.
This constant access to oxygen and nutrients helps plants grow incredibly fast. I saw my lettuce sprouts double in size in just a few days. It’s amazing to watch.
This efficiency is why many commercial growers use similar systems.
Benefits of Using an Aeroponic Gardening Tower
Let me tell you, using an aeroponic gardening tower has totally changed my gardening game. It’s not just a trend; it actually delivers on its promises.
Faster Growth Rates
This is one of the biggest wins. Because roots get direct nutrients and oxygen, plants grow much faster. I’m talking up to twice as fast as soil gardening.
I planted some basil in my tower and by the next week, it was already looking bushy. My soil basil usually takes much longer to get going. This means you can harvest more often.
It’s a gardener’s dream, honestly.
Water Efficiency
If you live somewhere dry or just hate wasting water, this is for you. Aeroponic systems use up to 90% less water than traditional soil gardening. The water is recycled within the system.
Very little is lost to evaporation or runoff. This is great for the planet and your water bill. I used to worry about my outdoor garden during dry spells.
Now, this little tower is super low maintenance on the water front.
Less Space Needed
You don’t need a big backyard to go vertical. These towers grow upwards. They take up a small footprint.
You can set one up on a balcony, a patio, or even indoors. I have mine tucked away in a corner of my kitchen. It’s so convenient to grab fresh herbs while I’m cooking.
This is perfect for small spaces. If you’ve always wanted a garden but thought you didn’t have the room, think again!
Fewer Pests and Diseases
Since there’s no soil, many common soil-borne pests and diseases are eliminated. You’re less likely to deal with fungus gnats or root rot from poor drainage. This means healthier plants.
And healthier plants mean better tasting food. I’ve noticed a huge difference in the quality of my greens. Plus, less pest management means less work for me.
It’s a win-win.
Year-Round Growing
With a tower, you can grow your own food no matter the weather. If you bring it indoors, you can use grow lights. This lets you have fresh produce even in the dead of winter.
Imagine fresh salads and herbs all year long! This has been amazing for my winter cooking. I don’t have to rely on store-bought produce as much.
Let’s look at how it stacks up against other methods:
| Feature | Aeroponic Tower | Soil Garden | Hydroponic (DWC) |
|---|---|---|---|
| Water Usage | Very Low | High | Low |
| Growth Speed | Very Fast | Moderate | Fast |
| Space Efficiency | High (Vertical) | Low (Horizontal) | Moderate |
| Pest/Disease Risk | Low | High | Moderate |
| Setup Complexity | Moderate | Low | Moderate |
| Nutrient Delivery | Mist | Soil/Amendments | Water Solution |
Setting Up Your Aeroponic Gardening Tower
Getting your aeroponic gardening tower ready to grow is easier than you might think. I remember my first setup. I was a little nervous, but it was quite straightforward.
Choosing a Location
First, pick a good spot. If it’s outdoors, think about sunlight. Most leafy greens and herbs love at least six hours of sun.
If you’re growing indoors, you’ll need a grow light. Make sure the spot is level and has access to an electrical outlet for the pump. I chose a spot near my kitchen window.
It gets good morning sun. For cooler months, I added a small LED grow light.
Assembling the Tower
Follow the instructions that come with your specific tower. Usually, it involves connecting the different sections. You’ll attach the reservoir, the tower bodies, and the lid.
Don’t overtighten anything. You’ll also need to connect the pump and the mister lines. This part can seem a bit confusing at first.
Just take your time and make sure all the connections are snug. Water leaks are no fun. Ensure the pump cord can reach the outlet safely.
Preparing the Nutrient Solution
This is critical. You’ll need a good quality hydroponic nutrient solution. Check the instructions for your tower and the specific plants you want to grow.
They usually come in two parts, A and B. Mix them according to the package directions. Always use clean water.
Tap water can sometimes have too many minerals. Distilled or filtered water is often best for hydroponics. I use a digital pH meter to check my solution.
Getting the pH right helps plants absorb nutrients. A pH between 5.5 and 6.5 is usually ideal for most plants.
Planting Your Seedlings
You can start seeds in rockwool cubes or similar starter plugs. Once they have a few sets of true leaves, they’re ready for the tower. Gently place each seedling into a net pot.
You can add a bit of clay pebbles or coco coir to support the base of the plant. Make sure the roots can hang down through the bottom of the net pot. You then place these net pots into the holes on your tower.
What Can You Grow in an Aeroponic Gardening Tower?
The beauty of an aeroponic gardening tower is its versatility. I’ve been able to grow so many different things. It’s not just for one type of plant.
Leafy Greens Galore
Lettuce, spinach, kale, arugula, Swiss chard, these are perfect for a tower. They have relatively shallow root systems. They grow quickly and you can harvest leaves as needed.
I always have a constant supply of fresh salad greens. It’s remarkable. My favorite is a mix of romaine and butter lettuce.
It’s so fresh!
Herbs of All Kinds
Basil, mint, parsley, cilantro, chives, rosemary, thyme. All these herbs thrive in an aeroponic setup. They produce abundant foliage.
You can snip them as needed for cooking. Having fresh herbs right in my kitchen makes a huge difference. My pasta dishes have never tasted better.
I recently tried growing dill, and it grew so tall and fragrant.
Fruiting Plants (with some considerations)
While leafy greens are the easiest, you can also grow some fruiting plants. Think strawberries, small peppers, and dwarf tomatoes. These need a bit more care.
They might need extra support as they grow. The fruiting plants need a more robust nutrient solution. They also require good light.
My strawberry tower is a bit of a project, but the tiny fruits are so sweet.
Other Options
Radishes and other root vegetables can be grown, though their typical harvest (the root) is harder to utilize in a tower. Broccoli and cauliflower are also possible but take up more space. Generally, smaller, faster-growing plants are the best bet for beginners with an aeroponic gardening tower.
Tips for Success with Your Aeroponic Gardening Tower
I’ve learned a few things through trial and error. These tips will help you get the most out of your tower.
Maintain Cleanliness
Regular cleaning is super important for aeroponic systems. Algae can grow in the reservoir and on surfaces if light gets in. This can clog your pump and lines.
I clean my reservoir every few weeks. I use a mild bleach solution or a specialized hydroponic cleaner. Rinse well before refilling.
This prevents issues.
Monitor Your Nutrient Solution
Don’t just fill it and forget it. Check the nutrient levels and pH regularly. Use test kits or meters.
Adjust the solution as needed. Plants use up nutrients. The pH can also drift.
If you see yellowing leaves, it might be a nutrient deficiency or a pH problem. This is where that simple bamboo stakes saved my plot article really hit home for me in a different context, plants needing specific care!
Watch for Root Health
Your roots are your plants’ lifeline. They should look white and healthy. Brown or slimy roots mean trouble.
This could be root rot from poor oxygen flow or an infection. Ensure your misting cycle is correct. Cleanliness also plays a huge role here.
Healthy roots mean healthy plants.
Start Simple
If you’re new to aeroponics, begin with easy plants like lettuce or herbs. Get comfortable with the system. Once you’ve mastered those, you can move on to more challenging crops.
My first attempt was pure lettuce. It was so successful that I felt brave enough to try tomatoes.
Be Patient
Even though aeroponics is fast, some things still take time. Give your plants a chance to establish themselves. Observe them.
Learn their needs. Sometimes a little patience is all you need. My journey has been incredibly rewarding, and I know yours will be too.
This might remind you of how I felt when this simple garden hack saved my plot.
Frequently Asked Questions
Is an aeroponic gardening tower difficult to set up?
No, setup is usually straightforward. Most towers come with clear instructions. It involves connecting a few main parts and your pump.
How much electricity do these towers use?
They use very little. The main power draw is the small water pump. It runs intermittently on a timer.
Can I grow vegetables other than greens?
Yes, you can grow herbs, strawberries, and even some small peppers or dwarf tomatoes with care.
Do aeroponic towers need special nutrients?
Yes, they require specific hydroponic nutrient solutions. These provide all the necessary minerals for plant growth without soil.
How often do I need to clean my tower?
Cleaning is recommended every 2-4 weeks. This prevents algae and keeps the system healthy for optimal growth.
I truly believe an aeroponic gardening tower can bring a new level of fresh food to your home. It’s a rewarding experience.