Tired of weather ruining your plants? I was too. My little backyard plot felt like a constant battle.
Then, I discovered something amazing. It changed how I grow everything. You can too.
Let’s explore this simple solution.
Why Choose Dome Gardening?
Dome gardening is a game changer. It’s like giving your plants their own cozy home. I started dome gardening a few years back.
My tomatoes were always sad. They’d get pounded by rain or wilt in the heat. Now, they’re happy and huge!
A garden dome protects your plants from harsh weather. Think strong winds, heavy rain, and even frost. It creates a stable, warm environment.
This lets plants grow bigger and healthier. I’ve seen my yields double, easily. It’s not just about protection, though.
It’s about giving your plants the best chance to thrive.
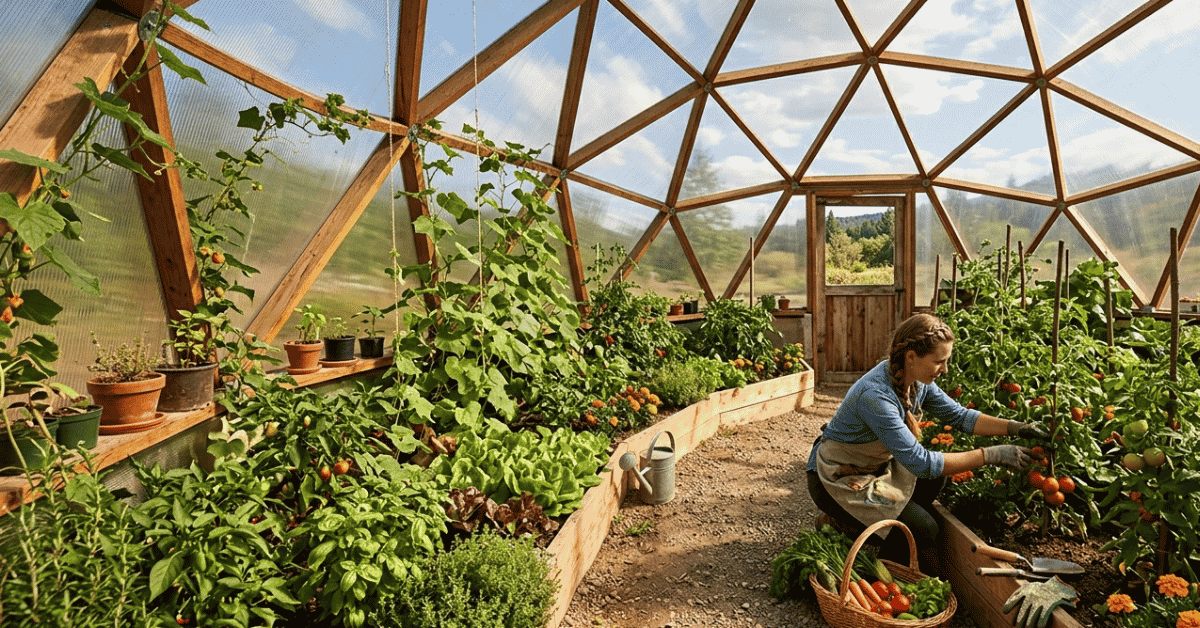
What Exactly is a Garden Dome?
A garden dome is a structure. It covers your plants. Think of it like a mini greenhouse.
But it’s usually more rounded, like a geodesic dome. They come in many sizes. Some are small, for just a few pots.
Others are big enough to walk inside. Most are made from a frame and clear panels. The frame can be PVC pipes, metal, or even bamboo.
The panels are usually strong plastic or glass. These let sunlight in. But they keep the weather out.
I’ve got a medium-sized one in my yard. It’s perfect for my herb garden and a few pepper plants. It’s quite striking to look at, too.
Types of Dome Gardening Structures
There are a few main styles you’ll see. Knowing them helps pick what’s right for you.
- Hoop Houses: These are simple, often made with bent pipes covered in plastic. They are usually low to the ground. Great for row crops.
- Geodesic Domes: These have a strong, often metal frame. They are very stable. They can be small or large enough to stand in.
- Pop-Up Domes: These are super easy. You just unfold them. They are lightweight and portable. Good for temporary needs.
My first dome was a smaller pop-up one. It was great for starting seedlings. Now, I have a more permanent geodesic one.
It’s a big upgrade.
Benefits of Using a Garden Dome
This is where the magic happens. The benefits are huge. I’ve seen them firsthand.
Extended Growing Seasons
This is a big one for me. I’m in a place with short summers. A dome lets me start plants much earlier.
I can plant seeds in early spring. The plastic cover traps heat. It warms the soil.
I’ve been harvesting lettuce well into late fall. Sometimes even into early winter! It feels like cheating, in a good way.
You get more time to grow what you love. This makes every season more rewarding.
Protection from Pests and Diseases
Bugs love my garden. Deer too. My old garden was a buffet.
Now, my dome acts like a barrier. It keeps most pests out. Squirrels can’t dig.
Rabbits can’t nibble. It also helps prevent fungal diseases. These often spread in wet, humid conditions outside.
The dome controls the environment better. This means fewer problems for my plants. I spend less time spraying and more time just enjoying my garden.
Optimized Growing Conditions
Inside a dome, you can control temperature and humidity. This is key for many plants. Especially those that are a bit fussy.
They like things just so. The sunlight comes in. But the heat stays trapped.
This creates a nice, warm microclimate. It’s like a tropical vacation for your plants. Certain vegetables, like peppers and tomatoes, absolutely love this.
They produce more fruit. They grow faster. It’s amazing to see the difference.
Water Conservation
Because the dome seals in moisture, less water evaporates. This means I need to water less often. Sometimes, just once a week is enough.
In a hot, dry summer, this is a lifesaver. It’s good for the plants. It’s also good for my water bill.
I’m not constantly running the hose. This makes dome gardening a more sustainable choice. It’s efficient use of resources.
Setting Up Your Own Dome Garden
It’s not as hard as it sounds. I actually found the setup pretty straightforward.
Choosing the Right Location
Pick a spot that gets lots of sun. At least six hours a day is best. If you have a choice, face the dome’s entrance away from the prevailing wind.
This makes it easier to get in and out. Make sure the ground is level. You don’t want your dome sitting crooked.
I picked a spot near my back door. It makes it easy to check on things. Plus, I can grab fresh herbs for cooking in seconds.
It’s been a huge convenience.
Assembling Your Dome
Follow the instructions that come with your dome. Most are quite simple. For pipe frames, you just connect the pieces.
For pop-up ones, it’s usually a quick unfold. Secure the dome to the ground. This is important, especially if you’re in a windy area.
You can use stakes or anchors. Make sure all the panels are fitted snugly. This keeps the heat in and the drafts out.
My first setup took about an hour. The new, bigger one took maybe two. It was a weekend project.
Preparing the Soil Inside
You can plant directly into the ground if your dome is on soil. Or you can use raised beds or containers inside. I went with raised beds.
This gives me more control over the soil quality. I mixed in compost and other good stuff. Good soil is the foundation for everything.
I want my plants to have the best start. This is where you can really customize. Make it rich and airy.
Your plants will thank you.
What You Can Grow in a Dome
Honestly, almost anything! But some plants really shine.
Vegetables That Love Domes
- Tomatoes: They need warmth and protection from blight. Domes are perfect.
- Peppers: They are heat lovers. Domes give them that consistent warmth.
- Cucumbers: They thrive in humid, warm conditions.
- Eggplant: Similar to peppers, they need heat to produce well.
- Melons: If you have space, watermelons and cantaloupes do great.
- Leafy Greens: You can extend the season for lettuce, spinach, and kale.
I’ve had the best luck with my tomatoes and peppers. The sheer number of fruits I get now is astounding. My little backyard plot feels like a market garden.
Herbs and Flowers
Don’t forget herbs! Basil, mint, cilantro, parsley, they all grow wonderfully. You can keep them producing for much longer.
And flowers? They’ll bloom earlier and last later. Imagine having fresh cut flowers from your dome in early spring.
It’s like a little piece of paradise.
Starting Seedlings
I use a smaller dome just for starting my seeds. It gives them a protected, warm start. This means healthier seedlings.
They are stronger when I transplant them out. It reduces transplant shock too. It’s a simple way to boost your success rate.
Dome Gardening vs. Other Gardening Methods
Let’s look at how it stacks up.
| Feature | Dome Gardening | Outdoor Garden | Raised Beds (Outdoor) |
|---|---|---|---|
| Season Length | Extended (early spring to late fall/winter) | Standard season | Slightly extended |
| Pest Control | Excellent barrier | Moderate to high | Moderate |
| Weather Prot. | Excellent (rain, wind, frost, hail) | None | Some, but vulnerable |
| Water Needs | Lower due to less evaporation | Higher | Moderate |
| Cost | Initial investment, then cost-effective | Low initial cost | Moderate initial cost |
| Effort | Moderate setup, lower maintenance | Low setup, higher maintenance (weeding, etc.) | Moderate setup, moderate maintenance |
My outdoor garden is still great for certain things. But for my most prized crops, the dome is unmatched. It’s a dedicated space.
It delivers results.
Tips for Success with Your Dome
A few things I’ve learned make a big difference.
Ventilation is Key
This is CRUCIAL. Even though you want to trap heat, you need airflow. Too much heat or humidity can cause problems.
Blight loves damp, still air. Open the vents or the door on warmer days. I usually open mine up for a few hours each afternoon.
This fresh air circulates. It helps prevent disease. It also helps pollinate fruiting plants.
Don’t forget to ventilate!
Monitor Temperature and Humidity
Use thermometers and hygrometers. These are cheap. They’ll tell you what’s going on inside.
You need to know when to open vents or add shade cloth. I’ve got a simple digital one. It helps me stay on top of conditions.
It prevents overheating when the sun is really strong.
Consistent Watering
While you water less often, don’t let plants dry out completely. Check the soil moisture regularly. The environment inside can dry out plants quickly if they aren’t watered.
Feel the soil a few inches down. If it’s dry, water. If it’s moist, wait.
Deep watering is better than frequent, shallow watering.
Fertilize Appropriately
Plants inside a dome can grow very vigorously. Because they have ideal conditions. This means they might need more nutrients.
Use good compost. Maybe add a balanced fertilizer. Follow the plant’s needs.
Don’t overdo it. Too much fertilizer can burn roots.
Is Dome Gardening Right for You?
If you’ve struggled with weather. Or pests eating your hard work. If you want a longer growing season.
Or just more success. Then I think dome gardening is an amazing option. It’s an investment.
Yes, you have to buy a dome. But the rewards are so worth it. I feel so much more connected to my food.
And the joy of eating produce I grew myself, perfectly ripe, is unmatched. It truly revitalized my love for gardening. My plots are no longer a battle.
They are a source of real joy.
Frequently Asked Questions
Is dome gardening expensive?
It requires an initial investment for the structure, but it’s cost-effective long-term.
Can I grow all my vegetables in a dome?
You can grow most things, but it’s best for heat-loving plants or those needing extended seasons.
What is the biggest challenge with dome gardening?
Managing ventilation and temperature can be tricky. Proper airflow is key.
How do I prepare the soil inside a garden dome?
Use rich compost and well-draining soil, or set up raised beds with your preferred mix.
Will a garden dome survive strong winds?
Yes, if properly anchored and constructed with sturdy materials, many domes are quite wind-resistant. Learn more about secure gardening.