To prepare a potato for planting, choose a healthy seed potato, check its eyes, and decide whether to plant it whole or cut it into pieces. Each piece should have at least one healthy eye, and cut pieces should dry in a cool, airy place before planting. Use certified seed potatoes when possible, then plant at the right time for your local growing season.
In the United States, potato planting time depends on your state, local frost dates, and spring soil conditions. Gardeners in parts of the South may plant earlier than those in the Midwest or Northeast, where cold soil can delay planting. A little preparation before planting can help you avoid rotten seed pieces and weak starts.
Preparing a potato is not hard, but a few details matter. You need the right tubers, clean cutting tools, healthy eyes, and suitable storage conditions. You also need to know when to leave a potato whole and when cutting it makes sense. This guide explains each step, including what to do if your potatoes sprout early or begin to rot.
Preparing a potato for planting means choosing healthy tubers and getting them ready to grow new plants. This may involve checking the eyes, allowing short sprouts to form, cutting large potatoes into pieces, and drying fresh cuts. The right steps depend on the potato’s size, condition, and intended planting method.
A potato eye is a small bud on the skin. Each healthy eye can produce a shoot that grows into a potato plant. The tuber also holds stored food that helps the young plant grow before its roots and leaves can support it.
Gardeners often call this process seed potato preparation. The word seed can be confusing because a seed potato is a tuber, not a true botanical seed. Potatoes can also grow from true seeds, but home gardeners usually plant tubers because this is the common and direct way to start a crop.
Source: gardenary-data.s3.amazonaws.com
Seed potato
A whole potato or potato piece grown for the purpose of producing a new plant.
Eye
A bud on the tuber’s surface that can produce a new shoot.
Chitting
A method of encouraging short, sturdy sprouts before planting. It is optional for many home gardens.
Curing cut seed pieces
Allowing freshly cut surfaces to dry and form a protective layer before planting.
Do You Need to Prepare Every Potato the Same Way?
No. Small, healthy seed potatoes can often be planted whole, while large tubers may be cut into several pieces. Potatoes with long, pale sprouts need gentle handling, and any tuber with soft rot should be discarded. Preparation should match the condition of the tuber rather than follow one rigid rule.
Small and firm
Usually plant whole if the tuber is healthy and has suitable eyes.
Large and firm
May be cut into pieces with at least one healthy eye each.
Soft, moldy, or foul smelling
Discard instead of trying to save it for planting.
Step 1: Choose the Right Seed Potatoes
Start with healthy seed potatoes from a garden center, farm supplier, or trusted seed source. Certified seed potatoes are generally the better choice because they are produced and inspected under a seed certification system intended to help limit the spread of certain potato diseases. Certification does not mean a tuber is guaranteed to be free of every problem, so inspect the potatoes before use.
Potatoes bought from a grocery store are not the best first choice for planting. Some are treated to slow sprouting, and their variety and disease status may be unknown. A grocery potato may still sprout, but that does not make it a reliable source of healthy planting stock.
Choose a variety that suits your climate, garden space, and planned harvest. Some varieties mature earlier than others, while some are better suited to storage or particular cooking uses. Your local cooperative extension office or seed supplier can help you match a variety to your region.
Source: i.dailymail.co.uk
Look for firm flesh
Choose tubers that feel solid and have no soft, wet, or sunken areas.
Check the skin
Avoid potatoes with extensive mold, deep wounds, or signs of spreading decay.
Inspect the eyes
Several healthy eyes give you options when deciding whether to plant the tuber whole or cut it.
Read the variety label
Check the expected maturity, regional suitability, and any handling advice supplied with the seed potatoes.
Can You Plant Potatoes From the Grocery Store?
You can sometimes grow plants from grocery store potatoes if they sprout, but the result is less predictable than using seed potatoes. Some store potatoes sprout slowly, and others may carry diseases that can remain in the soil or affect future crops. If you want a more dependable garden crop, buy seed potatoes intended for planting.
For a small experiment
A healthy, unsprayed or untreated potato may be worth trying, provided you accept uncertain results.
For a planned crop
Choose certified seed potatoes and follow local planting advice.
Step 2: Store Potatoes Properly Before Planting
Keep seed potatoes in a cool, dark, and well-ventilated place until you are ready to prepare them. Avoid sealed plastic bags, damp corners, and spots that get hot in the sun. Poor airflow and excess moisture can encourage rot, while warmth and light can lead to long, weak sprouts.
If your seed potatoes arrive weeks before planting time, check them from time to time. Remove any tuber that develops soft rot or a foul smell so it does not affect nearby potatoes. Keep healthy tubers separate from rotting ones, and avoid washing them before storage unless the supplier gives different instructions.
Do not confuse seed potato storage with storing potatoes for eating. The goal here is to keep planting stock healthy until it is time to prepare and plant it. If sprouts begin to grow, assess their length and strength rather than assuming that any sprout means the potato is ready.
Source: diyjoy.com
Use a cool location
Keep the tubers away from heaters, direct sun, and other sources of excess heat.
Allow airflow
Use a ventilated crate, tray, or paper container rather than a tightly sealed bag.
Check for decay
Remove soft or moldy tubers promptly and keep the remaining potatoes dry.
What If Your Potatoes Sprout Too Early?
Short, sturdy sprouts are usually easier to handle than long, pale ones. If sprouts have formed before the garden is ready, move the potatoes to a cool place with suitable light if you want to encourage stronger sprouts. Handle them gently because broken sprouts can delay growth, though a healthy tuber may form new shoots.
Do not rush to plant simply because the eyes have sprouted. Soil that is too cold or wet can harm seed pieces. Wait until the local planting conditions are suitable, and follow regional guidance for timing.
Short and sturdy sprouts
Handle with care and prepare the tuber for planting.
Long, pale sprouts
Avoid breaking them, provide better light, and reassess planting readiness.
Sprouts with soft, dark, or moldy tissue
Inspect the tuber closely and discard it if decay is present.
Step 3: Decide Whether to Plant Potatoes Whole or Cut
Plant a small, healthy seed potato whole when it has enough viable eyes and fits your planting plan. Cutting is most useful for larger tubers because one potato can provide several planting pieces. Each cut piece must have at least one healthy eye and enough flesh to support early growth.
Do not cut every potato just to make more pieces. Very small pieces have less stored food and may dry out or rot before the shoots become established. A larger piece can offer a stronger reserve, although exact size recommendations vary by supplier and growing conditions.
If you are unsure, follow the directions that came with your seed potatoes. Different varieties and planting systems may call for slightly different handling. Clean cuts, sound tubers, and proper curing matter more than trying to produce the maximum number of pieces.
Source: backyardboss.net
Plant whole
Use this method for small, healthy tubers that are large enough to establish a plant.
Cut into pieces
Use this method for larger tubers, making sure every piece has a healthy eye and enough flesh.
Do not use tiny scraps
Pieces with very little flesh may have too few reserves to establish well.
How Many Eyes Should Each Piece Have?
Aim for at least one healthy eye on each seed piece. Two eyes can offer some backup if one fails, but more eyes are not always better because they may produce more shoots competing for space and resources. Place cuts so each piece has a sound section of flesh around its eye.
One healthy eye
A common minimum for a cut seed piece.
Two or more eyes
Can be useful when the piece is large enough and the eyes are well spaced.
No visible healthy eyes
Do not use the piece as planting stock.
Step 4: Cut Seed Potatoes the Right Way
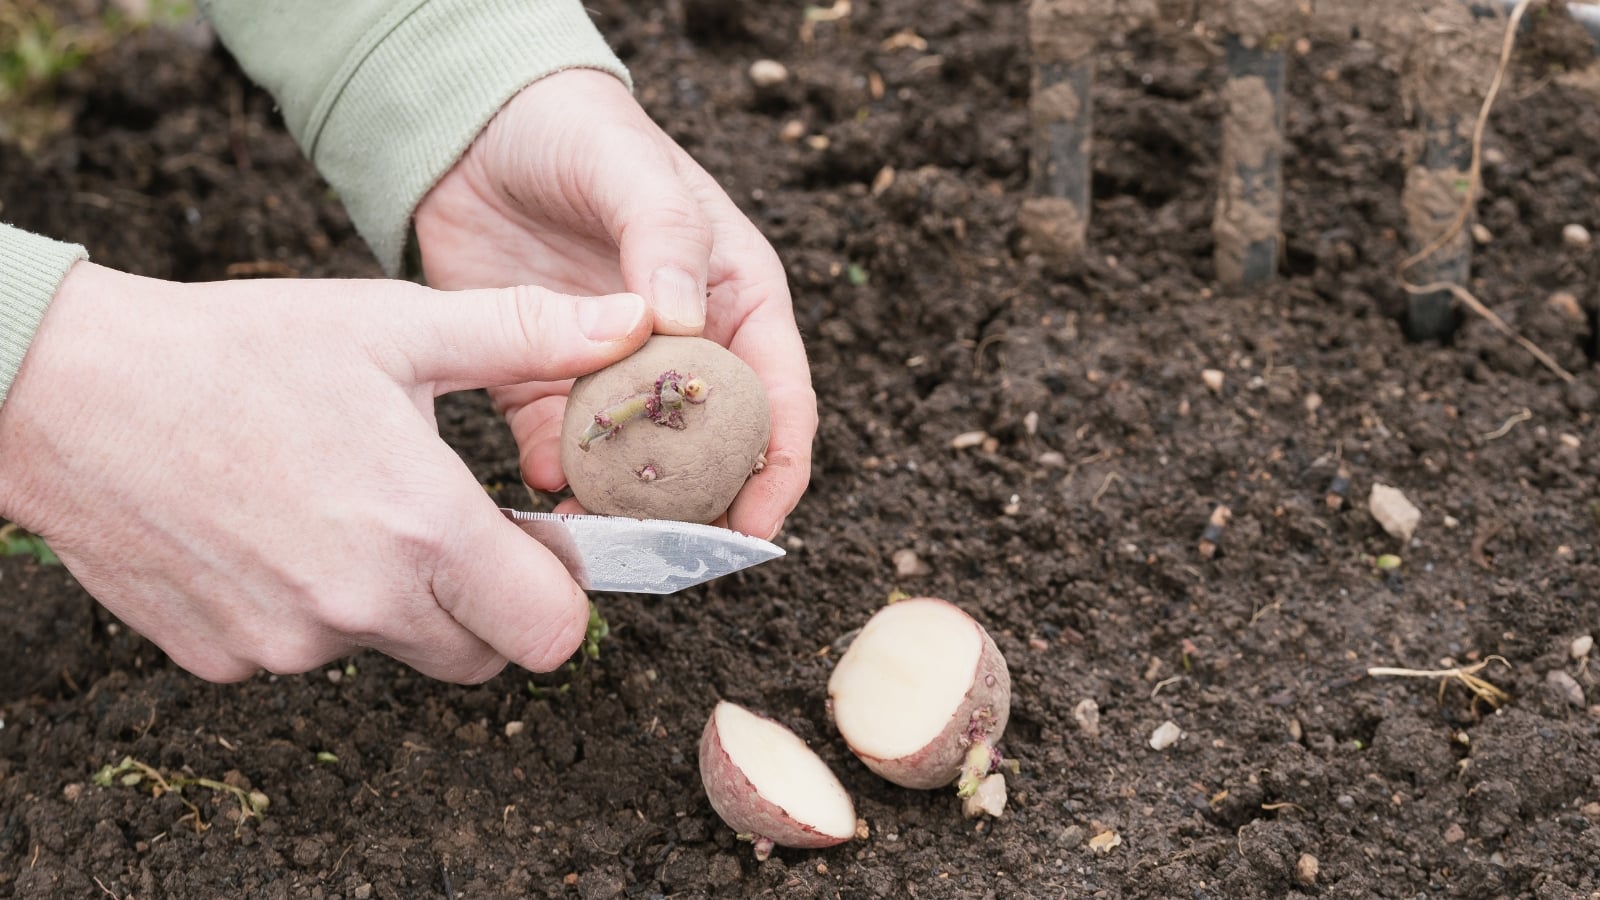
Use a clean, sharp knife to cut large seed potatoes into pieces. Before starting, wash your hands and clean the work surface. Clean the knife between tubers, especially if you see any suspicious marks or soft areas, because contaminated tools can spread disease from one tuber to another.
First, inspect the potato and locate the healthy eyes. Plan each cut before slicing so the eyes remain on pieces with enough flesh. Avoid chopping the tuber into equal chunks without checking where the eyes sit, because some pieces may end up without a usable bud.
Make firm, smooth cuts instead of crushing the flesh. Discard any part that shows internal rot, unusual discoloration, or a foul smell. Do not try to rescue a diseased piece by cutting around a small soft spot unless a trusted local seed supplier or extension service has given specific advice for the condition.
Source: static1.backyardbossimages.com
Clean the knife
Use a clean blade and sanitize it between tubers when needed, following the label directions for any sanitizer.
Map the eyes
Look over the whole tuber before making cuts so each piece retains a healthy bud.
Make smooth cuts
Avoid tearing or crushing the tissue, which can leave damaged surfaces.
Discard suspect tubers
Do not plant pieces from a tuber with clear signs of rot or serious disease.
Should You Remove Long Sprouts Before Cutting?
Do not remove healthy sprouts automatically. Short, firm sprouts can be useful, but they are easy to break during cutting and handling. If a tuber has long sprouts, work slowly and avoid placing the knife where it will crush or sever every viable eye.
Healthy short sprouts
Keep them intact where practical and handle the tuber gently.
Broken sprouts
A sound tuber may grow new shoots, but establishment can be delayed.
Step 5: Cure Cut Potato Pieces Before Planting
After cutting, let the pieces sit in a cool, well-ventilated place so the cut surfaces can dry and form a protective layer. Gardeners often call this curing or allowing the cuts to suberize. The protective layer can help reduce moisture loss and make the cut surface less vulnerable to decay.
Spread the pieces in a single layer rather than piling them together. Keep them out of direct sun and away from excessive heat. The goal is a dry surface, not shriveled flesh or long, weak sprouts.
Curing time depends on temperature, humidity, airflow, and piece size. Several days may be enough under suitable conditions, but a fixed number of hours is not a guarantee. Check the cut surfaces before planting and follow any curing directions provided by the seed supplier.
Source: i.ytimg.com
Use a dry, airy space
Good airflow helps the fresh cuts dry without trapping moisture around the pieces.
Keep pieces in one layer
This reduces contact between wet cuts and makes inspection easier.
Avoid strong heat
High temperatures can stress or dry the pieces too much.
Check before planting
The cut surface should be dry rather than wet and freshly exposed.
How Do You Know When Cut Seed Potatoes Are Ready?
The cut face should look dry and may feel slightly firm compared with a fresh cut. It should not be wet, slimy, or foul smelling. A dry surface does not make a rotting tuber safe to plant, so inspect the whole piece as well.
Ready
The cut surface is dry, the flesh remains firm, and the eye looks healthy.
Needs more time
The cut is still visibly wet and the piece remains sound.
Discard
The piece becomes soft, slimy, moldy, or foul smelling.
Step 6: Should You Sprout Potatoes Before Planting?
Pre-sprouting, also called chitting, is optional for many home gardeners. It means encouraging short shoots before the tubers go into the soil. This can help you see which eyes are active and may give plants a head start in some growing conditions, but it is not required for every variety or garden.
To chit potatoes, place healthy seed tubers in a cool, bright spot with indirect light and good airflow. An open egg carton or shallow tray can help keep them apart, provided the container is clean and the tubers are not crowded. Avoid dark, warm storage if it produces long, pale, fragile sprouts.
A sprouted potato is not automatically ready to plant. The soil still needs to be suitable, and the sprouts need gentle handling. If the tubers have already developed short, strong shoots, there may be no need to delay planting solely to follow a set chitting schedule.
Source: i.pinimg.com
Use indirect light
Light helps encourage sturdier sprouts than those often formed in darkness.
Allow space
Keep tubers in a single layer so sprouts are less likely to break.
Avoid excess warmth
Warm conditions can encourage weak growth and cause the tubers to lose moisture.
What Is the Difference Between Chitting and Curing?
Chitting encourages sprouts before planting, while curing helps fresh cut surfaces dry and form a protective layer. They are different tasks with different goals. Whole potatoes being chitted do not need cut-surface curing unless they have been cut.
Chitting
Encourages short sprouts on seed potatoes before planting.
Curing
Dries the exposed surface of cut seed pieces.
Step 7: Prepare the Garden Before Planting
Prepare the planting site before you bring the seed pieces out. Potatoes grow best in loose, well-drained soil with enough space for roots and tubers to develop. Compacted soil and spots that stay waterlogged can make growth harder and increase the risk of decay.
Choose a site that receives plenty of direct sun during the growing season. Remove weeds and loosen the soil without working it when it is wet and sticky. If your garden soil drains poorly, a raised bed or another well-drained growing area may be more suitable.
Use mature compost to improve soil structure when needed, but avoid adding fresh manure or excessive fertilizer just before planting. Too much nitrogen can encourage leafy growth at the expense of tuber development. A soil test can help you decide whether lime, fertilizer, or other amendments are needed.
Source: epicgardening.com
Check drainage
Avoid areas where water sits after rain or irrigation.
Loosen the soil
Create room for roots and developing tubers without compacting wet ground.
Choose a sunny site
Potatoes generally need good sunlight for healthy growth.
Use soil test results
Base fertilizer and pH adjustments on local recommendations rather than guesswork.
When Should You Plant Potatoes in the United States?
Planting dates vary across the United States. In many cooler regions, gardeners plant in spring as the soil becomes workable and local conditions permit. Some southern areas can support earlier planting or a fall crop, while hot summers can make timing more difficult.
Do not use one national calendar date for every garden. Check your local cooperative extension guidance and the expected weather. If the soil is cold and soaked, waiting for better conditions is often wiser than planting prepared pieces into ground where they may rot.
Cool northern regions
Use local spring planting guidance and avoid working soil that is too wet.
Milder southern regions
Check regional recommendations for early planting or a suitable fall crop.
Warm or humid locations
Pay close attention to drainage, local disease pressure, and the crop’s expected growing period.
Step 8: Plant the Prepared Potato Pieces
Plant the seed potatoes after the pieces have cured and the garden is ready. Follow the spacing and depth recommended for your variety and growing method. Traditional garden rows, raised beds, and containers can require different arrangements, so avoid treating one spacing rule as universal.
Place each piece with its eye or sprout facing upward when practical. Cover it with soil according to your chosen planting method, then water enough to settle the soil without leaving it soggy. If you use containers, make sure they have drainage holes and enough room for the plants to grow.
Mark the row or container so you know where the potatoes are planted. Keep the soil evenly moist as the plants establish, but do not keep it saturated. As stems grow, gardeners commonly mound soil around the base to protect developing tubers from sunlight.
Source: i.ytimg.com
Set pieces gently
Avoid snapping sprouts or scraping away the eyes during planting.
Cover appropriately
Use the depth and spacing recommended for your variety and planting system.
Water with care
Moisten the soil without creating standing water.
Label the planting
Record the variety and date so you can track growth and expected maturity.
What Should You Do After Planting?
Check the soil regularly and water when needed, taking rainfall into account. Remove weeds while they are small, and watch for damaged leaves, poor growth, or signs of pests. As the stems grow, mound soil around their bases or use another suitable method to keep developing tubers covered.
Avoid digging around the planting site to check for progress. Sprouts can take time to emerge, especially when conditions are cool. If a planting spot stays wet or a piece fails to grow after a reasonable period, inspect the growing conditions before assuming the seed potato was bad.
Maintain even moisture
Avoid long dry spells and waterlogged soil.
Protect developing tubers
Keep tubers covered with soil so sunlight does not turn them green.
Monitor growth
Look for healthy shoots and leaves, while checking for signs of rot or pest damage.
Common Potato Preparation Problems and How to Fix Them
Most problems begin with poor seed stock, excess moisture, damaged sprouts, or planting at the wrong time. Check the condition of the tuber first, then review how it was stored and whether the soil is suitable. Do not assume that more cutting, more watering, or extra fertilizer will solve a weak start.
Source: gardenary-data.s3.amazonaws.com
The cut surface stays wet
Spread pieces apart in a cool, ventilated place and allow more time to dry. Discard pieces that turn soft or slimy.
The potato has long, weak sprouts
Move it to a cooler place with indirect light and handle it carefully. Avoid breaking every sprout during preparation.
A piece has no eye
Do not plant it as a normal seed piece. Set it aside for disposal or other appropriate use rather than expecting reliable growth.
The potato smells bad
Discard it. A foul smell, wet rot, or soft flesh is a warning sign, not a normal part of preparation.
No shoots appear
Check planting depth, soil temperature, moisture, and the time since planting. Cold or waterlogged soil can delay emergence or damage the seed piece.
Plants grow leaves but few tubers
Review sunlight, variety, watering, growing temperatures, and fertilizer use. Excess nitrogen may encourage leafy growth, while heat and other growing stresses can affect tuber formation.
Can You Plant a Potato That Has Started to Rot?
No. Do not plant a soft, slimy, moldy, or foul-smelling potato. Cutting away a visible patch does not reliably remove disease from the remaining tissue. Discard the affected tuber, clean the tools and work surface, and inspect nearby seed potatoes before continuing.
Remove the affected tuber
Keep it separate from healthy planting stock.
Clean tools
Clean and sanitize the knife or other equipment according to the product label.
Check storage conditions
Improve airflow and remove excess moisture to reduce further losses.
A Simple Checklist Before You Plant
Use this final check before putting prepared seed potatoes into the garden. It helps catch common problems while there is still time to fix them.
Source: backyardboss.net
Seed stock is healthy
The tubers are firm and show no clear signs of decay.
Every cut piece has an eye
Each piece has at least one healthy bud and enough flesh to support early growth.
Cut surfaces are dry
Freshly cut pieces have had time to cure and are not wet or slimy.
Sprouts are handled gently
Healthy shoots have not been crushed or needlessly removed.
The garden is ready
The soil drains well, is workable, and suits the local planting season.
The planting plan is clear
You know the recommended spacing, depth, watering plan, and variety.
Frequently Asked Questions
Q
Do I need to cut a potato before planting?
No. Small, healthy seed potatoes can often be planted whole. Larger tubers may be cut into pieces to provide more planting units, but each piece should have at least one healthy eye and enough flesh to support early growth. Follow the guidance supplied with your seed potatoes.
Q
How long should cut potatoes dry before planting?
Allow enough time for the cut surfaces to dry and form a protective layer. Under suitable conditions, this may take several days, but temperature, humidity, airflow, and piece size affect the process. Check that the surface is dry and the flesh remains firm instead of relying only on a fixed time.
Q
Can I plant a potato with long sprouts?
You may be able to plant it if the tuber is firm and healthy, but long sprouts can break easily. Handle the potato gently and avoid damaging every eye. If the sprouts are pale and weak, provide suitable light and cooler conditions while you prepare the garden.
Q
Should potato eyes face up or down?
Place the main eye or sprout facing upward when practical. This gives the emerging shoot a direct path toward the soil surface. Do not force a piece into an awkward position if doing so would break its sprouts or damage the flesh.
Q
Can I plant a potato that has turned green?
Green skin indicates exposure to light and can be associated with increased glycoalkaloids, including solanine. Avoid eating green potatoes or using badly greened, damaged tubers as planting stock. For a home garden, healthy certified seed potatoes are a more dependable option than potatoes that have been poorly stored for food.
Q
Is chitting necessary before planting potatoes?
No. Chitting is an optional step for many gardeners. It encourages short sprouts before planting and can help you see which eyes are active, but healthy seed potatoes can also grow without pre-sprouting. Local growing conditions and the instructions for your variety should guide your decision.
Q
Can I plant potato pieces immediately after cutting?
Planting freshly cut pieces immediately can increase the chance that exposed surfaces remain vulnerable to decay, especially in cold or wet soil. Allowing the cuts to dry and form a protective layer is a common precaution. If your supplier provides specific handling instructions, follow those directions.
✦ Wrapping Up
Conclusion
Preparing a potato for planting starts with healthy seed stock. Check the tubers, keep them in suitable storage, and decide whether to plant them whole or cut them into pieces. When cutting is needed, make sure each piece has a healthy eye and enough flesh, then allow the fresh cuts to dry before planting.
Good preparation also depends on timing. Choose a sunny, well-drained site and plant when local soil and weather conditions are suitable. Keep the soil evenly moist, protect developing tubers from sunlight, and watch for signs of rot or weak growth. A careful start gives your potato plants a better chance to establish and produce a useful harvest.
💡 Key Takeaway
Before planting, inspect every seed potato, cut only healthy large tubers, allow cut surfaces to dry, and check local planting guidance. If a potato is soft, slimy, or foul smelling, discard it rather than planting it.