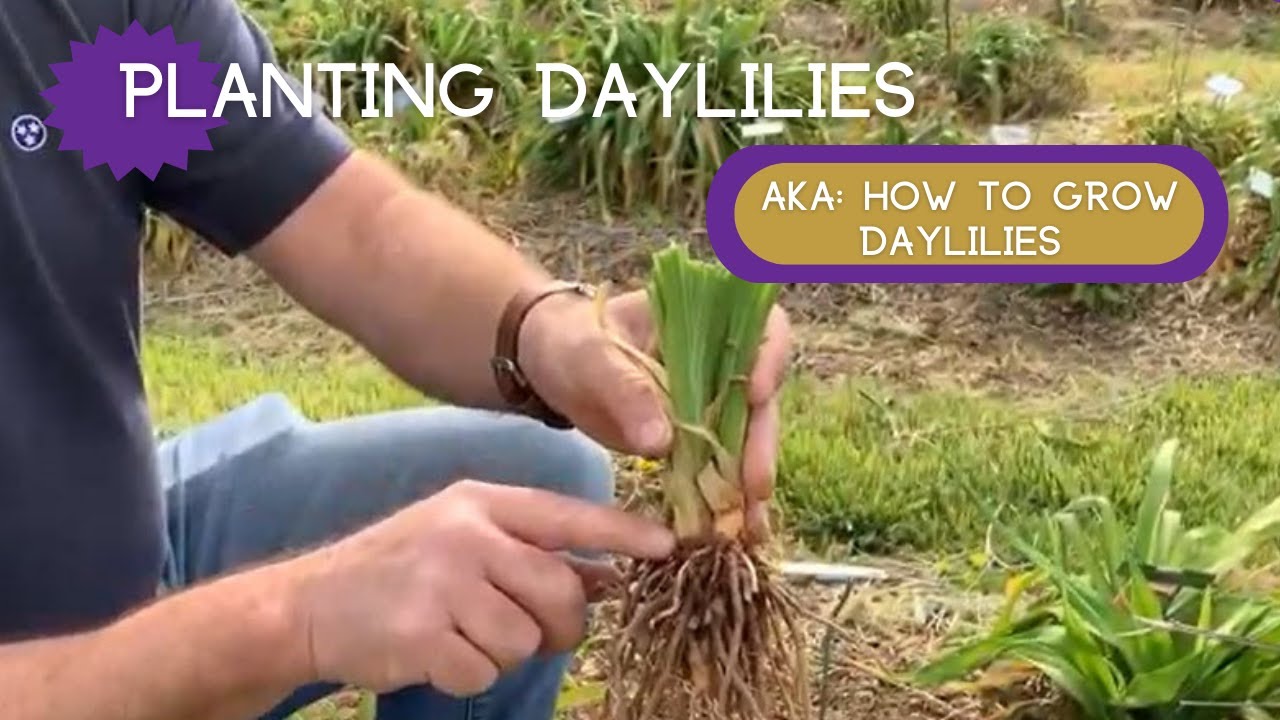
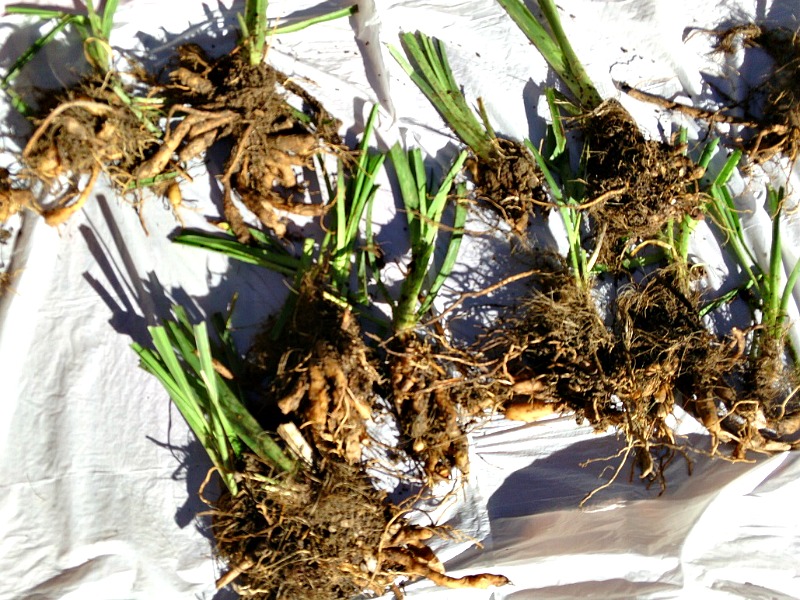
To plant a daylily bulb, first check whether you have a bare-root daylily division or a true flower bulb. daylilies grow from fleshy roots attached to a crown. Place the crown at or slightly below soil level, spread the roots, cover them with loose soil, and water well. Choose a sunny spot with good drainage for the best start.
In American gardens, daylilies are popular along walkways, in sunny flower beds, and around mailboxes. They grow in many parts of the country, from cool northern states to warm southern regions. Their long green leaves add color before and after the flowers appear. With the right planting depth and steady care, these hardy perennials can grow into full clumps that bloom year after year.
The phrase daylily bulb can be confusing. A daylily is not planted like a tulip or daffodil bulb. Most daylilies sold for garden planting are bare-root divisions, potted plants, or clumps with fleshy roots. Each division has a crown where the roots meet the leaves. That crown must sit at the right depth. Plant it too deep, and growth or flowering may suffer. Leave too much of the root system exposed, and the plant may dry out.
This guide explains how to prepare the site, plant a daylily division, water it, and solve common problems. The steps suit home gardeners in the United States, but planting dates depend on local weather and soil conditions. The key is simple: protect the roots, keep the crown near the soil surface, and avoid ground that stays wet.
Source: dxorybjlh.blob.core.windows.net
Understand What a Daylily Bulb Really Is
Before you dig a hole, identify the type of planting material you have. The term daylily bulb often refers to a bare-root division sold in a bag or box. However, daylilies grow from a crown and a mass of fleshy roots rather than from the layered bulbs found on tulips and daffodils.
The crown is the short area where the leaves meet the roots. New leaves grow from this point, and the roots take up water and nutrients from the soil. A healthy division should have firm roots and a sound crown. It may have green leaves, trimmed foliage, or little top growth, depending on when it was dug and shipped.
A daylily division may look small and plain when it arrives. That does not mean it is dead. Some bare-root plants have few leaves when dormant. Check the roots and crown instead of judging the plant by its size alone. Soft, foul-smelling, or badly decayed tissue is a warning sign.
Source: storage.googleapis.com
Crown
The central growing point where the leaves and roots meet. Keep it near the soil surface.
Fleshy roots
These store water and help the plant settle into its new site. Spread them gently when planting.
Leaf fan
The cluster of long leaves growing from one crown. A division often has one or more fans.
True bulbs
Tulips and daffodils grow from true bulbs. Do not use their planting depth or planting method for daylilies.
Check the Plant Before You Start
Remove the daylily from its packaging and look at the roots. They should feel firm rather than slimy. A little dryness on the outside can occur during shipping, but roots that crumble, smell rotten, or show extensive decay may not recover well.
If the plant has arrived with dry bare roots, keep them out of direct sun and wind while you prepare the bed. If the roots seem dehydrated, briefly soaking them in clean water may help. Do not leave the plant soaking for many hours or let it sit in standing water after planting.
Healthy signs
Firm roots, a solid crown, and living leaf tissue where leaves remain.
Warning signs
A mushy crown, widespread black rot, or a strong rotten smell.
Choose the Best Time to Plant Daylilies
The best time to plant daylilies is during mild weather when the soil is workable and the roots have time to settle before severe heat or cold. In much of the United States, early spring is a reliable choice. Early fall can also work in areas where the ground stays warm long enough for roots to establish before winter.
Local weather matters more than a fixed date on the calendar. A gardener in Minnesota may need to wait until frozen ground thaws, while a gardener in Georgia may have a longer spring planting window. In hot parts of Texas, Arizona, and the Deep South, avoid planting during extreme summer heat when possible.
Daylilies can often be planted at other times if the weather is suitable and the plant receives proper care. Container-grown plants are usually more flexible than bare-root divisions because their roots are already surrounded by growing medium. Even so, newly planted daylilies need extra care during heat waves, drought, or sudden cold snaps.
Source: dooleygardens.com
Early spring
A useful time in many northern and central states once the soil can be worked without being wet and sticky.
Early fall
Often suitable in regions with a long, mild fall. Allow time for root growth before the ground freezes.
Summer
Plant only when conditions allow careful watering and protection from extreme heat. Hot, humid weather can raise the risk of root or crown rot.
Frozen or waterlogged ground
Wait until the soil is workable. Digging into saturated soil can damage its structure and make planting harder.
How Regional Weather Changes the Planting Window
In the Northeast and upper Midwest, spring planting after the soil thaws gives roots time to grow before summer. In the Mid-Atlantic and Southeast, both spring and early fall may be suitable, depending on local temperatures. In the hottest southern areas, mild spring weather or a cooler late-fall period may be more practical than midsummer.
Gardeners in dry western states should also consider irrigation. A planting date that works in a cool coastal garden may be harder to manage in a hot inland yard. Check the expected weather for the next several days and avoid planting bare roots just before a stretch of extreme heat.
Practical rule
Plant when the soil is workable, the roots can stay moist, and the plant is not facing severe heat or an immediate freeze.
Select a Sunny Spot With Good Drainage
Choose a place that gets about six hours of direct sunlight each day if you want reliable flowering from many daylily varieties. Most daylilies grow well in full sun, though some can tolerate partial shade. In very hot areas, a little afternoon shade may help darker flowers hold their color.
Soil drainage is just as important as sunlight. Daylilies can grow in a range of soil types, including sandy and clay-rich soil, but roots should not sit in water for long periods. A low spot that remains soggy after rain can lead to poor growth or rot. If water often pools in the bed, choose another location or improve the planting area before adding the plants.
Look at nearby trees and shrubs, too. Their roots may compete with daylilies for moisture and nutrients. A sunny border with open soil is often easier to manage than a narrow patch under a large tree.
Source: dxorybjlh.blob.core.windows.net
Sunlight
Aim for six or more hours of direct sun where practical. Check the needs of the specific cultivar.
Drainage
Use soil that drains after rain rather than staying saturated for long periods.
Room to grow
Leave enough space for mature leaves and flowers, and avoid placing divisions too close to competing shrubs.
Access to water
A site near a hose or watering can makes it easier to care for new plants during dry weather.
How to Check Your Garden Soil
Look at the bed a few hours after a steady rain. If water still pools around the planting spot, drainage may be poor. You can also dig a small test hole, fill it with water, and observe whether the water drains away. This is a simple screening check, not a formal soil test.
If the soil is heavy or compacted, loosen it before planting and mix in a modest amount of mature compost when useful. Compost can improve soil structure, but it does not fix every drainage problem. A site with a high water table or persistent standing water may need a different planting location or a properly designed raised bed.
Avoid soggy soil
Do not place daylily roots in a hole that fills with water and remains flooded.
Do not over-amend the hole
Prepare a broad area so roots can grow into the surrounding soil instead of sitting in a small pocket of different material.
Prepare the Soil Before Planting
Prepare the bed before you open the roots for planting. Remove weeds, grass, stones, and old plant debris from the immediate area. Loosen the soil with a garden fork or hand tool so the roots can spread without meeting a hard, compacted layer.
Work the soil to a depth of roughly 6 to 12 inches where the site and soil allow. The goal is a loose root zone, not a deep pit filled with soft soil. For several daylilies, prepare the whole bed instead of digging isolated holes in otherwise compacted ground.
Mix mature compost into poor soil when needed. Sandy soil may benefit from added organic matter that helps it hold moisture. Heavy soil may also improve with organic matter, although good drainage still matters. Avoid adding large amounts of fertilizer to the hole, as concentrated fertilizer can harm roots and excess nutrients may encourage leaves at the expense of flowers.
Source: www.pinterest.com
Remove weeds
Clear perennial weeds before planting. Established weeds can compete with young daylilies and become harder to remove later.
Loosen compacted soil
Break up dense soil so roots can spread into the bed.
Add compost if needed
Use mature compost to improve the soil rather than relying on fresh manure or a heavy dose of fertilizer.
Level the planting area
Make the surface even enough to judge the crown depth accurately.
Do Daylilies Need Fertilizer at Planting?
Not every new daylily needs fertilizer at planting. Start with a suitable site and healthy soil. If a soil test shows a nutrient shortage, follow the test recommendations and the label for any product you use. A balanced fertilizer labeled for perennial flowers may be useful in some gardens, but extra fertilizer cannot make up for poor drainage or incorrect planting depth.
Avoid placing dry fertilizer directly against bare roots. If you use a granular product, apply it according to its label and keep it away from direct contact with the crown and roots. A light layer of compost is often enough when the soil already has suitable fertility.
Use only what is needed
Soil condition and the product label should guide fertilizer use.
How to Plant a Daylily Bulb Step by Step
Once the site is ready, planting a daylily division is straightforward. The main tasks are making a wide enough hole, setting the crown at the correct level, spreading the roots, and watering the soil. Work gently, because the fleshy roots can break if you force them into a hole that is too small.
For a bare-root division, make the hole wide enough for the roots to fan out. A small mound of soil in the center can help support the crown while the roots fall outward. The crown should finish at or slightly below the soil line, commonly no more than about 1 inch below it.
If you are planting a potted daylily, use the depth of the existing root ball as a guide. Remove the pot without pulling on the leaves. Loosen roots only if they are tightly circling, and set the plant so the crown is close to the surrounding soil level. Do not bury the crown deeply to make the plant look more secure.
Source: dxorybjlh.blob.core.windows.net
Step 1: Inspect the division
Check that the crown is firm and the roots are not badly damaged. Remove only dead or rotten material with a clean tool.
Step 2: Make a wide hole
Dig a hole that gives the roots room to spread. Do not force the roots into a narrow, deep hole.
Step 3: Form a small mound
Place a little loose soil in the center if needed to support the crown and guide the roots outward.
Step 4: Set the crown
Hold the crown at or just below the soil surface. For many bare-root divisions, about 1 inch below the surface is a useful upper depth guideline.
Step 5: Spread the roots
Arrange the roots around the mound. Let them point outward and downward without sharp bends.
Step 6: Backfill the hole
Add soil around the roots and work it into the gaps. Press lightly to remove large air pockets without packing the soil hard.
Step 7: Water thoroughly
Water slowly until the root zone is moist and the soil settles around the roots. Add a little more soil if settling exposes the roots.
Step 8: Check the final depth
Make sure the crown has not sunk too deep and the roots are covered. Leave the soil surface level with the surrounding bed or slightly depressed to help direct water toward the plant.
How Deep Should You Plant Daylily Roots?
Plant the crown close to the soil surface rather than measuring the depth from the tips of the roots. The roots can extend farther down and outward, while the crown stays near the top. For many bare-root daylilies, placing the crown about 1 inch below the soil line is a common guideline. The precise depth can vary with the plant’s original growing depth and the instructions supplied by the grower.
A crown buried several inches deep may struggle to grow well or flower as expected. A crown that sits too high can leave roots exposed and dry. After watering, look at the plant from the side and confirm that the crown is still at the intended level.
Correct
The crown sits at or slightly below the surface, with the roots covered by soil.
Too deep
The crown is buried well below the surrounding soil, which can hinder growth.
Too shallow
The roots or the base of the crown remain exposed and can dry out.
How Far Apart Should Daylilies Be Planted?
For many daylily varieties, allow about 18 to 24 inches between plants. Large cultivars may need more room, while compact varieties can fit closer together. Check the mature width listed for the variety if you know its name.
Close spacing can create a fuller display sooner, but crowded plants may need division earlier. Wider spacing gives each clump room to grow and can improve airflow around the foliage. For a new border, mark the planting spots before digging so the plants form an even row or a natural-looking group.
Small cultivars
Use the mature width listed for the variety to avoid overcrowding.
Medium and large cultivars
About 18 to 24 inches is a useful starting point for many varieties, with more room for larger clumps.
Water and Care for Newly Planted Daylilies
Water a newly planted daylily right after you finish filling the hole. Apply water slowly so it reaches the roots instead of running off the surface. This first watering settles the soil around the plant and helps reduce air gaps that could leave roots dry.
During the first few weeks, check the soil often. It should stay lightly moist while new roots form, but it should not remain waterlogged. Sandy soil can dry quickly, while clay-rich soil may hold water longer. Adjust your watering to the soil and weather rather than following the same schedule every day.
Once established, daylilies can tolerate some dry weather, but they generally grow and flower better with adequate moisture. A deep watering during a dry spell is often more useful than frequent, shallow splashes. Avoid watering on a fixed schedule when rain has already kept the soil moist.
Source: dxorybjlh.blob.core.windows.net
Water at the base
Direct water toward the soil and roots instead of repeatedly wetting the foliage.
Check before watering
Feel the soil a short distance below the surface. Water if the root zone is drying, and wait if it is still wet.
Use mulch carefully
A thin layer of organic mulch can help conserve moisture and suppress weeds. Keep it away from direct contact with the crown.
Remove weeds
Pull weeds while they are small so they do not compete with new roots for water and nutrients.
Should You Cut Back Daylily Leaves Before Planting?
Bare-root daylily divisions often arrive with their leaves shortened. If the foliage is long and floppy, trimming it can reduce wind stress and make the plant easier to handle. Use clean shears and avoid cutting into the crown.
There is no need to remove every healthy leaf from a plant that is already growing well. Leaves help the plant make food. For a freshly divided plant, follow the nursery’s instructions when provided, especially if the cultivar has unusual growth habits.
Trim damaged leaves
Remove dead or badly damaged foliage with clean shears.
Keep the crown intact
Do not cut into the central growing point when tidying the leaves.
When Should You Add Mulch?
Add mulch after the soil has been watered and the plant is set at the correct depth. Shredded leaves, fine bark, or another suitable garden mulch can help slow moisture loss and reduce weeds. A layer around 1 to 2 inches thick is often enough for a small planting, but the best depth depends on the material and local conditions.
Keep the mulch pulled back from the crown. A thick, wet pile over the growing point can trap moisture and make it harder to spot early signs of rot. In cold regions, a seasonal winter mulch may help protect newly planted divisions, but avoid smothering the plant.
Leave space around the crown
Keep mulch from touching the central growing point.
How to Tell Whether Your Daylily Is Growing Well
A newly planted daylily may not show fast growth right away. It needs time to adjust to its new site and grow roots. Some divisions produce fresh leaves quickly, while dormant plants may take longer to show clear signs of growth.
Look for firm leaves, a stable crown, and soil that drains between waterings. New green growth from the center is a helpful sign that the plant is active. Do not dig up the division every few days to check the roots, because repeated disturbance can slow establishment.
Flowering is not the only measure of success during the first season. A small division may focus on building roots and leaves before it produces many blooms. Flowering also depends on the variety, plant size, sunlight, weather, and the time of year it was planted.
Source: www.pinterest.com
New leaves
Fresh growth from the crown often signals that the plant is settling in.
Firm foliage
Leaves that remain firm after watering are generally more reassuring than foliage that stays limp in moist soil.
Stable crown
The crown should remain at the correct depth instead of sinking deeply or becoming exposed.
No foul smell
Healthy roots should not develop a strong rotten odor. A foul smell with soft tissue may indicate decay.
What if the Daylily Does Not Bloom the First Year?
A daylily that grows leaves but does not bloom may simply need more time. Newly planted or recently divided plants often need to rebuild their root systems. Short sunlight exposure, deep planting, drought, excessive shade, or heavy competition can also limit flowering.
Check the growing conditions before adding fertilizer. Make sure the plant receives enough sunlight and that the crown is not buried too deeply. Keep weeds under control and water during dry periods. If the plant is healthy but young, give it another growing season before deciding that something is wrong.
Check sunlight first
Move or adjust plants in deep shade when practical, allowing for the cultivar’s light needs.
Review planting depth
Correct a deeply buried crown carefully if the plant is not establishing well.
Avoid excess fertilizer
More fertilizer does not guarantee more flowers and can encourage unwanted leafy growth.
Common Daylily Planting Problems and How to Fix Them
Most planting problems can be traced to a few basic issues: poor drainage, incorrect crown depth, damaged roots, too little water during establishment, or severe heat. Check these factors before buying treatments or applying fertilizer. A simple change in watering or planting depth may solve the problem.
Look at both the plant and the soil before deciding what has gone wrong. Wilting in dry soil suggests a different issue from wilting in wet soil. Yellow leaves may result from transplant stress, normal aging, water problems, or other causes. One symptom alone does not confirm a specific disease.
Source: dxorybjlh.blob.core.windows.net
Leaves wilt soon after planting
Check soil moisture first. Water if the root zone is dry, but do not add more water if the soil is saturated. Protect a new plant from extreme heat where practical.
The crown is buried too deep
Carefully lift the division and reset it at the correct level if it is newly planted and has settled too far down.
Roots remain exposed
Add enough loose soil to cover the roots while keeping the crown near the surface.
The plant does not grow
Check for a firm crown, suitable moisture, drainage, and a reasonable planting depth. A dormant plant may take time to resume growth.
The crown becomes soft or smells rotten
Suspect decay. Remove standing water, check drainage, and inspect the affected tissue. Discard a division with extensive rot rather than planting it in another bed.
The plant grows leaves but produces few flowers
Review sunlight, plant maturity, crowding, and crown depth before changing the fertilizer routine.
Can You Save a Daylily With Damaged Roots?
A division with a few broken roots may still establish if the crown is firm and healthy. Trim badly damaged or rotten sections with a clean tool, then plant the remaining healthy roots in well-drained soil. Water carefully and avoid disturbing the plant while it recovers.
A division with a completely mushy crown or widespread decay is much less likely to recover. Do not place rotten material in a planting hole and expect extra water or fertilizer to fix it. If the cause is unclear and the problem spreads to nearby plants, seek advice from a local Cooperative Extension office or a qualified plant health specialist.
Keep healthy tissue
Retain sound roots and a firm crown when a division has limited damage.
Clean tools
Clean tools after cutting diseased tissue and before working on healthy plants.
Planting Daylilies in Pots or Small Gardens
You can grow many daylily varieties in containers if the pot has drainage holes and enough room for the roots. Choose a container that can hold the plant as it grows, and use a quality potting mix rather than dense garden soil alone. A pot that is too small dries out quickly and may restrict the root system.
Set the plant at the same general crown depth used in a garden bed. Spread the roots through the potting mix, fill around them, and water until excess water drains from the bottom. Empty any saucer that collects water rather than letting the roots sit in it.
Container-grown daylilies may need more frequent watering than plants in the ground, especially during hot summer weather. Check the pot daily during warm, dry spells, but water only when the mix needs it. Place the container where the variety receives suitable sunlight, and protect the pot from extreme temperature swings when needed.
Source: dxorybjlh.blob.core.windows.net
Choose drainage holes
A container must let excess water escape.
Use suitable potting mix
Choose a mix that holds some moisture but does not stay waterlogged.
Allow room for roots
Use a pot with enough width and depth for the mature plant, not just the small division.
Monitor moisture
Pots can dry faster than garden beds, so check them more often during hot weather.
Should You Start Bare-Root Daylilies Indoors?
You can temporarily pot bare-root daylilies indoors if outdoor conditions are unsuitable or the plants arrive before the garden is ready. Use a pot with drainage, spread the roots, and keep the crown near the surface. Place the pot in a bright location and avoid keeping the mix constantly wet.
Indoor growing is usually a temporary step rather than a requirement. Once outdoor conditions are suitable, gradually adjust the plant to outdoor light and temperatures before moving it into its permanent bed. Sudden exposure to strong sun can stress foliage that has grown indoors.
Use indoor potting as a temporary measure
Move the plant outdoors when weather and soil conditions are suitable.
Long-Term Care After the Daylily Establishes
After the plant has settled in, daylily care is usually simple. Keep weeds away, water during prolonged dry periods, and remove dead foliage when needed. Many established daylilies cope with normal garden conditions, but they flower best when sunlight, moisture, and soil drainage suit the variety.
Remove spent flowers if you want a tidier display. Each individual daylily flower usually lasts about one day, but a flower stalk can carry several buds that open over time. Removing faded flowers can improve the plant’s appearance and stop seed pods from forming when seed is not wanted.
As the clump grows, it may become crowded. Daylilies can be divided to make more plants or to renew an overgrown clump. Early spring or the period just after flowering can be suitable, depending on the local climate. Replant each healthy division with its own crown and roots, using the same planting method described above.
Source: www.pinterest.com
Water during dry spells
Deeply soak the root zone when needed instead of relying on frequent light watering.
Keep weeds under control
Remove weeds before they spread into the daylily clump.
Remove dead foliage
Trim dead or damaged leaves with clean tools while keeping the crown intact.
Divide crowded clumps
Separate established clumps when they outgrow their space or flower less well because of crowding.
How Long Does It Take for a Daylily to Bloom?
Bloom time depends on the variety, planting date, plant size, and local growing conditions. A mature division planted during a suitable season may flower in its first growing season, while a small or stressed division may focus on root growth and leaf production first.
Daylilies also vary in bloom season. Some flower earlier than others, and some varieties may rebloom when conditions suit them. Check the plant label for the expected bloom period and mature size instead of assuming every daylily will flower at the same time.
Be patient with young plants
Healthy leaf growth is a useful sign even when flowers do not appear right away.
A Simple Daylily Planting Checklist
A short checklist can help you avoid the most common planting errors. Before you begin, confirm that the division is healthy, the site drains well, and you can water it after planting. Once the plant is in the ground, focus on the crown depth and root coverage rather than packing the soil hard.
Keep the plant label if the variety has a known name. Mature height, flower color, bloom season, and spacing can differ between cultivars. A label also helps you remember which plants need more room or may benefit from afternoon shade.
Source: dxorybjlh.blob.core.windows.net
Before planting
Choose a suitable time, select a sunny site, remove weeds, and loosen the soil.
During planting
Spread the roots, set the crown near the surface, backfill gently, and water thoroughly.
After planting
Check moisture, keep weeds down, and make sure the crown has not settled too deep.
During the first season
Watch for new leaves, water during dry periods, and give the plant time to establish before judging its flowering.
What to Do on Planting Day
Keep the roots shaded while you work, especially on a warm or windy day. Finish the planting hole before leaving the roots exposed for a long time. Water the plant as soon as it is set, then check the crown level after the soil settles.
If you have several divisions, plant them one at a time rather than leaving every root system out in the open. This simple habit reduces drying and makes it easier to keep track of which variety goes in each spot.
Work in a steady order
Prepare one hole, plant the division, water it, and then move to the next plant.
Frequently Asked Questions
Q
Can I plant a daylily bulb directly in the ground?
Yes, if what you have is a healthy bare-root daylily division. Prepare loose, well-drained soil, spread the roots, and place the crown at or slightly below the soil surface. Water thoroughly after planting. If the item is labeled as a true bulb, check its plant name first because daylilies are not true bulb plants.
Q
How deep should I plant a daylily bulb?
For many bare-root daylily divisions, set the crown about 1 inch below the soil surface or a little shallower when the grower’s instructions call for it. Spread the roots beneath and around the crown, then cover them with soil. Do not bury the crown several inches deep.
Q
Do daylilies need full sun?
Most daylilies flower best with about six hours or more of direct sunlight each day. Some varieties tolerate partial shade, and darker flowers may benefit from protection during the hottest part of the afternoon. Heavy shade can lead to fewer flowers.
Q
Should I soak daylily roots before planting?
Briefly soaking dry bare roots in clean water may help rehydrate them before planting. Follow the nursery’s directions if available, and do not leave the roots submerged for an extended period. Plant promptly, keep the roots out of direct sun and wind, and water well after planting.
Q
How often should I water newly planted daylilies?
Water deeply at planting, then check the soil regularly while the roots establish. Water again when the root zone begins to dry. Sandy soil and hot weather may require more frequent watering than cool weather or moisture-retentive soil. Avoid keeping the soil constantly soggy.
Q
Can I plant daylilies in the fall?
Yes, fall planting can work in many parts of the United States if the soil is workable and enough mild weather remains for root growth before the ground freezes. In very cold regions, plant early enough to allow establishment. In hot southern regions, choose a cooler period and avoid extreme heat and humidity.
Q
Why is my newly planted daylily turning yellow?
Yellow leaves can result from transplant stress, normal leaf aging, too much water, too little water, or other growing problems. Check soil moisture and drainage first. If the crown is soft or smells rotten, inspect for decay. Do not assume yellow leaves always mean the plant needs fertilizer.
Q
How long does a newly planted daylily take to grow?
The timing varies with the plant’s condition, variety, season, and local weather. A healthy division may send up new leaves soon after planting, while a dormant division may take longer. Give it suitable light, moisture, and drainage, and avoid digging it up repeatedly to check its progress.
✦ Wrapping Up
Conclusion
Learning how to plant daylily bulb divisions comes down to a few simple steps. Choose a site with good sunlight and drainage, loosen the soil, and make a hole wide enough for the roots. Set the crown near the surface, spread the roots gently, cover them with soil, and water the plant well.
After planting, check the soil before watering again. Keep weeds away, use mulch without covering the crown, and give the plant time to establish. A new division may not bloom right away, but healthy roots and fresh leaf growth are good signs that it is settling in.
The planting season should fit your local climate, not just the calendar. Spring works well in many regions, while early fall can suit areas with a long, mild season. When in doubt, follow the nursery’s planting instructions for the exact cultivar and focus on keeping the roots healthy rather than forcing fast growth.
💡 Key Takeaway
Before you plant, check three things: the division has a firm crown, the soil drains well, and the planting hole lets the roots spread. Set the crown at or just below the surface, water thoroughly, and monitor soil moisture as the daylily establishes.