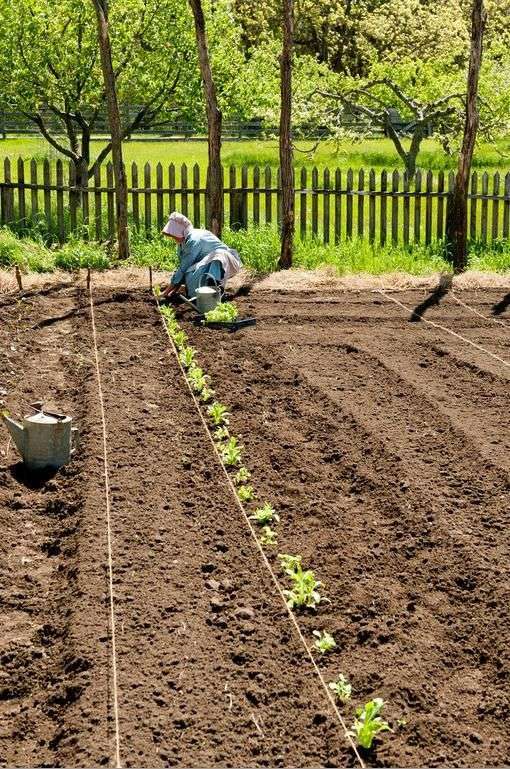
Setting my new garden straight means planning the space, leveling the ground where needed, marking clear bed edges, and making straight planting rows. Start by checking sunlight, drainage, and soil conditions. Then use stakes and string to lay out the beds before you plant. A little planning now makes watering, weeding, and harvesting much easier later.
Across the United States, a new garden can take many forms. You might have a small backyard in Ohio, a sunny side yard in Texas, or a raised bed beside a home in California. The same basic steps apply, but local weather, soil, and the plants you want to grow will shape the final layout. A straight garden is not just about looks. It also helps you use space well and reach each plant without stepping on the soil where roots need room.
Before buying plants or digging rows, walk around the space and decide how you want to use it. Check where the sun falls during the day, look for spots where rainwater collects, and make sure you can reach each bed with a hose or watering can. You do not need costly tools for this job. A tape measure, a few stakes, string, a shovel, and a simple plan on paper are enough to get started. The aim is to build a garden that is neat, easy to care for, and suited to your yard.
Source: blogspot.com
What Does Setting a New Garden Straight Mean?
Setting a new garden straight means laying out a garden in a clear, orderly way before planting. You decide where the beds, rows, paths, and larger plants will go. You then mark those areas so the finished garden is easy to work in and simple to maintain.
The word straight does not mean every part of your yard must be flat or perfectly square. A sloped yard, curved border, or small uneven patch can still make a good garden. The main goal is to create a layout that fits the land and gives plants the space, light, water, and soil they need.
For a vegetable garden, this often means making straight rows or rectangular beds. For a flower garden, it may mean setting clear borders and arranging plants by height, color, or bloom time. A mixed garden can use both methods. The right layout depends on what you want to grow and how much time you can spend on care.
Source: gardenary.com
Clear layout
Each bed, row, path, and planting area has a planned place.
Good access
You can reach plants to water, weed, prune, and harvest without damaging nearby growth.
Healthy growing conditions
Plants have suitable light, soil, moisture, and room to grow.
Should Every Garden Have Straight Rows?
No. Straight rows work well for many vegetables and make it easier to spot gaps, weeds, and watering problems. However, a small herb bed or flower border may work better with blocks, groups, or gentle curves. You can keep the paths and bed edges straight while arranging plants in a more natural way.
Use rows
Rows are useful for crops such as carrots, beans, onions, and lettuce when their spacing and care needs suit row planting.
Use blocks
Blocks can make good use of space in raised beds, provided each crop has enough room and air flow.
Use curves
Curved borders can suit ornamental gardens and irregular yards where a strict grid would look out of place.
Step 1: Choose the Right Place for Your Garden
Choose a spot that matches the needs of the plants you plan to grow. Most common fruiting vegetables, such as tomatoes, peppers, and cucumbers, need several hours of direct sun each day. Leafy crops and some herbs can handle less sun, though growth and harvest size may change. Check the growing instructions for each crop instead of assuming every plant needs the same conditions.
Watch the site at different times of day before you set the layout. A space that looks sunny in the morning may sit in shade by afternoon. Nearby walls, fences, trees, and buildings can block light. Trees may also compete with vegetables for water and nutrients through their roots.
Water access matters too. A garden at the far end of the yard may look nice, but carrying water there every day can become a chore. Pick a location where you can water without stretching a hose across a busy walkway or creating a trip hazard.
Source: wainhomes.co.uk
Check sunlight
Record the hours of direct sun in the areas you are considering, then match the site to your crops.
Check drainage
Look for places where rainwater stays for long periods. Poor drainage can harm many garden plants.
Check access
Make sure you can reach the garden with your tools, water supply, and harvested produce.
Check nearby hazards
Avoid areas exposed to roof runoff, chemical spills, or other possible sources of contamination.
How Much Sun Does a New Garden Need?
The answer depends on the plants. Many fruiting vegetables grow best in a sunny spot with roughly six to eight hours of direct light, while some leafy greens and shade-tolerant plants can grow with less. Hot climates may also call for afternoon shade for certain crops. Use crop-specific guidance and local growing advice when deciding where each plant belongs.
Sunny site
Often suits tomatoes, peppers, squash, and many other crops that produce fruit above the ground.
Partly shaded site
May suit lettuce, spinach, and some herbs, depending on the season and local temperatures.
Step 2: Measure the Garden and Draw a Simple Plan
Measure the length and width of the area you want to use. Write down the measurements and note any fixed features, such as fences, trees, sheds, taps, and doors. A rough sketch on paper is enough. You do not need design software to plan a small garden.
Mark the space for beds first, then add paths. Paths are easy to overlook when you focus on planting, but they are part of the working garden. If a bed is too wide to reach from either side, you may need to step into it to weed or pick vegetables. That can press down the soil and make root growth harder.
For a first garden, a simple rectangular layout is often easier to measure and maintain than a complex design. Keep the shape flexible if your yard has unusual corners or slopes. The best plan is one that fits the actual space rather than forcing the land into a shape that causes trouble later.
Source: gardenfurniturecentre.co.uk
Measure the full area
Record the length and width, including any space that must remain open for access.
Mark fixed features
Show trees, drains, fences, walls, taps, and other features that affect planting.
Add paths
Leave enough room to walk, carry tools, and reach the center of each bed.
Plan for mature plants
Use the expected spread of each crop rather than the size of a seedling.
A Simple Example for a Small Backyard
Suppose your planned garden area is 12 feet long and 8 feet wide. You could set up two beds that are each 3 feet wide and 12 feet long, with a 2-foot path between them. This uses the full width of the space: 3 feet for one bed, 2 feet for the path, and 3 feet for the other bed. Check that the beds remain reachable from their outer edges and that the layout leaves any needed access around the garden.
Example only
These measurements are a planning example, not a universal rule. Adjust the width and path space to your reach, mobility, tools, and site.
Step 3: Gather Basic Tools and Mark Straight Lines
You can mark a new garden with a few basic tools. A tape measure helps set equal distances, wooden stakes hold the corners, and garden string marks straight bed edges or planting rows. A shovel or spade helps prepare the ground, while a rake breaks up surface clods and smooths loose soil.
Start by marking the corners of each bed. Measure from a fixed edge or reference point so the beds sit where you planned them. Push stakes into the ground and pull string tight between them. Check each measurement before digging, because a small mistake at the first corner can make the far end of a long bed drift out of line.
For a rectangular bed, compare the two diagonal measurements. If both diagonals are equal, the layout is usually square when the side lengths are also correct. This simple check helps when you want clean corners and straight paths. For a small informal garden, careful measuring by side may be enough.
Source: storage.googleapis.com
Tape measure
Use it to measure bed lengths, widths, paths, and row spacing.
Stakes and string
Use them to mark straight lines that remain visible while you work.
Spade or shovel
Use it to remove weeds, loosen suitable soil, and shape bed edges.
Rake
Use it to level loose soil and remove larger stones or plant debris.
How to Make a Straight Planting Row
Place a stake at each end of the planned row and tie string between them. Pull the string taut, then mark a shallow furrow along the line with a hoe or suitable hand tool. Follow the seed packet for sowing depth and spacing. Remove or reposition the string before plants grow into it, and avoid leaving loose string where wildlife or people could become caught.
Keep the line taut
A loose string can sag and make the row curve.
Measure between rows
Follow crop spacing guidance and leave room for mature foliage and access.
Check before sowing
Make sure the row is straight and the soil is ready before placing seeds.
Step 4: Clear the Ground Without Damaging the Soil
Clear weeds, rubbish, stones, and unwanted plant growth before setting the final bed shape. The right method depends on what is already growing there. A patch covered with grass may need a different approach from an old flower bed or a spot filled with persistent weeds.
For a small area, you can remove turf with a spade or cover the grass with suitable cardboard and organic mulch as part of a no-dig approach. If you use cardboard, remove plastic tape and labels, overlap the sheets, and wet them so they stay in place. Add a suitable layer of compost or other clean organic material above it. Grass suppression takes time, and persistent perennial weeds may return.
Avoid digging wet, sticky soil. Working soil when it is too wet can damage its structure and leave hard clods when it dries. To check, take a small handful of soil and squeeze it gently. If it forms a wet, sticky ball that smears easily, wait until it dries enough to crumble more readily.
Source: www.youtube.com
Remove rubbish
Clear plastic, building waste, and other debris before preparing the growing area.
Identify persistent weeds
Find out whether the site has deep-rooted or spreading weeds before covering or digging the area.
Protect soil structure
Avoid heavy foot traffic and digging when soil is saturated.
Keep useful plants
Mark healthy plants you want to retain before clearing the site.
Should You Dig or Use a No-Dig Method?
Digging can help when you need to remove turf, loosen compacted ground, or mix in a soil amendment recommended by a soil test. A no-dig approach can reduce soil disturbance and may suit a new bed built over grass. Neither method solves every problem. Deep-rooted weeds, poor drainage, contaminated soil, and severe compaction may need separate treatment before planting.
Dig when needed
Use careful digging for turf removal or a clear, specific soil preparation need.
Limit disturbance
Avoid turning the soil over again and again without a reason.
Step 5: Test the Soil Before Adding Amendments
Healthy garden soil needs the right balance of air, water, organic matter, and plant nutrients. Soil color alone cannot tell you whether a garden has enough nutrients or the right pH. A soil test can help you make informed choices before you spend money on compost, lime, or fertilizer.
In the United States, many state university Cooperative Extension services offer soil testing guidance or direct gardeners to suitable laboratories. Follow the instructions for collecting a sample. A sample should represent the area you plan to plant, and separate areas with clearly different soil or past use may need separate tests.
Read the test results before applying amendments. Lime is used to raise soil pH when a test indicates that it is needed, while other products may be used to lower pH in suitable conditions. Adding either without checking can move the soil farther from the range your plants need. Fertilizer should also match the crop, soil results, and local recommendations.
Source: gardenary.com
Test soil pH
Check whether the soil is acidic or alkaline enough for the crops you plan to grow.
Review nutrients
Use the test results to guide fertilizer choices rather than guessing.
Add organic matter carefully
Use suitable, mature compost when appropriate and avoid filling beds with unknown material.
Check site history
If the soil may contain lead, pesticides, or other pollutants, seek appropriate testing before growing edible crops.
How Much Compost Should You Add?
The amount depends on the existing soil, the type of compost, and the plants you intend to grow. A thin layer incorporated into the upper soil or used as a surface dressing may be suitable for many gardens, but adding large amounts of compost or manure can cause nutrient imbalances. Use local Extension advice and test results to guide the amount. Do not assume that more organic matter always means better soil.
Use mature compost
Choose compost that has finished decomposing and does not contain obvious plastic or other waste.
Avoid fresh manure on edible crops
Fresh manure can damage plants and may introduce harmful germs. Follow current food-safety and local gardening guidance for manure use.
Step 6: Level the Beds and Set Clear Edges
A well-prepared bed has a stable surface that lets water soak in without creating large puddles or washing soil away. Remove high spots and fill small dips with suitable soil or compost as needed. Rake the surface gently rather than pressing it down hard.
Leveling does not mean flattening the entire yard. On a sloped site, a level raised bed or a properly designed terrace may help create a useful growing area. However, cutting into a slope or building retaining walls can affect drainage and soil stability. For steep slopes, major grading, or walls that hold back substantial soil, get qualified local advice before changing the ground.
Define the bed edges so they remain clear through the season. You can use a spade to cut a simple edge, or install suitable edging that does not create a hazard. Keep the path surface distinct from the growing soil. This makes it easier to walk around the garden without crushing plants or spreading soil onto walkways.
Source: www.reddit.com
Smooth the surface
Rake out small bumps and fill shallow hollows before sowing seeds.
Keep the soil loose
Avoid packing down the bed after leveling.
Check drainage
Do not create a bowl-shaped bed that traps excess water around plant roots.
Mark the boundary
Use a clear edge so paths and planting areas do not slowly blend together.
How to Set Up a Raised Garden Bed
Place a raised bed on a stable site with suitable light and drainage. Check that the frame is level enough for its intended use and that water can drain away. Fill it with a suitable growing mix for the crops you plan to grow. If the bed sits over existing ground, consider the soil below it because roots may extend down into that layer.
Choose safe materials
Use materials intended for garden use and avoid wood treated with unknown chemicals.
Plan water access
Place the bed where you can water it without dragging a hose across busy paths.
Keep access in mind
Choose a width that lets you reach the center from the sides without standing on the soil.
Step 7: Plan Straight Rows and Give Plants Enough Room
Set row positions only after the beds and paths are ready. Read seed packets or plant labels for spacing between plants and rows. Those measurements are based on the needs of each crop, so do not use one spacing rule for every vegetable.
Plant size matters more than the size of the seedling you see on planting day. A young zucchini plant may look small, but it can spread far beyond its original planting spot. Tomatoes may need support and space for air to move around the foliage. Crowded plants can be harder to water, inspect, and harvest.
Straight rows are especially useful when you sow small seeds that are hard to distinguish from weeds. The row helps you find the crop as it grows. However, do not make rows so close together that mature plants block paths or shade nearby crops that need full sun.
Source: mommycoddle.com
Follow crop spacing
Use the recommended distance between plants and rows for the specific variety.
Consider mature width
Leave enough space for leaves, stems, roots, and supports as plants grow.
Plan supports early
Allow room for stakes, cages, trellises, or other support systems.
Keep paths open
Make sure a growing plant will not block the main route through the garden.
Can You Use Square Foot Gardening Instead of Rows?
Yes. Square foot gardening divides a bed into small sections, with the number of plants in each section based on crop size and recommended spacing. It can help organize a small raised bed and make the planting plan easy to follow. It still requires careful spacing, good soil, and access to water. Large crops need more room than small crops, even when they share the same bed.
Rows suit repeated sowing
They can be handy for crops such as carrots, radishes, and beans planted in lines.
Grids suit compact beds
A grid can make it easier to plan a mix of small crops in a limited space.
Step 8: Match the Planting Plan to Your Local Climate
The best planting time depends on your region, the crop, and the weather. A garden calendar that works in Minnesota may not fit Florida, Arizona, or coastal Oregon. Use local planting calendars from a Cooperative Extension service or another reliable regional source, and check the expected last or first frost date where relevant.
Cool-season crops such as peas, spinach, and some lettuces can often be planted before warm-season crops. Tomatoes, peppers, and many types of squash need warmer conditions. Exact timing varies by crop and variety, so check the seed packet and local advice before sowing.
Heat, rain, wind, and humidity can also change the layout you need. In hot regions, afternoon shade or mulch may help some crops cope with heat. In wet regions, raised beds or improved drainage may help prevent roots from sitting in water. In windy areas, consider support for tall plants and keep lightweight items secured.
Source: storage.googleapis.com
Check local planting dates
Use guidance for your state or region rather than following a calendar from a different climate.
Group similar crops
Place plants with similar water and light needs near one another when practical.
Prepare for local weather
Consider heat, frost, strong wind, heavy rain, and the length of the growing season.
What If You Are Starting a Garden in a Hot Region?
In places with very hot summers, planting dates and afternoon sun can make a major difference. Some cool-season crops may perform better in the cooler months, while warm-season crops need enough warmth to grow but may struggle during extreme heat. Choose varieties suited to your region, keep soil moisture steady, and use mulch when appropriate. Check local Extension advice for crop timing in your area.
Watch heat stress
Wilting during the hottest part of the day can have several causes, so check soil moisture before watering more.
Protect young plants
Use suitable shade protection when needed, while leaving enough light and air flow for healthy growth.
Step 9: Water the New Garden and Watch How It Drains
Water the garden after planting according to the needs of the crop and the moisture already in the soil. Seeds and new transplants often need more frequent checks than established plants because their roots have not spread far. Water slowly enough for moisture to soak into the root zone instead of running off the surface.
There is no single watering schedule that fits every garden. Sandy soil may drain quickly, while clay soil may hold water longer. Temperature, wind, rainfall, plant size, and container or bed depth also affect how often you need to water. Check the soil near the roots before adding more water.
Observe the garden after rain or watering. If water collects in one spot, the surface may be uneven or the soil may drain poorly. If water runs off a bed, it may be too compacted, too dry at the surface, or on a slope. Adjust the watering method and investigate persistent drainage problems before adding more water.
Source: ruralmessenger.com
Check root-zone moisture
Feel the soil near the roots instead of relying only on the surface appearance.
Water gently
Use a method that does not wash seeds away or expose plant roots.
Watch for puddles
Persistent standing water may signal a drainage problem that needs attention.
Adjust as plants grow
Established plants may need a different watering pattern from new seedlings.
How Can You Tell if a New Garden Is Too Wet?
Soil that stays saturated can limit the air available to roots. Signs may include prolonged puddles, a sour smell, yellowing leaves, or plants that wilt even though the soil is wet. These signs are not proof of one cause, but they tell you to check drainage and root conditions. Avoid adding water until you have checked whether the soil is already too wet.
Pause watering
Check soil moisture before watering again.
Look at the whole site
Check whether runoff from roofs, paths, or nearby ground flows into the bed.
Seek site-specific help
Persistent waterlogging may need advice from a local gardening or drainage professional.
Common Mistakes When Setting a New Garden Straight
Many garden layout problems begin before the first seed goes into the ground. A bed may look tidy but receive too little sun, have poor drainage, or leave no room to reach the plants. Checking the site, measurements, and soil first can prevent much of this extra work.
Another common mistake is trying to make every part of the garden perfectly level. Slight changes in ground height are normal, and the right response depends on the slope and drainage. Large changes to a sloped yard can cause runoff or stability problems, so avoid major earthworks without suitable advice.
It is also easy to plant too much at once. A small garden with enough space for each crop is often easier to care for than a crowded garden full of seedlings. Start with a layout you can water, weed, and harvest well, then add more beds as you learn what works.
Source: blogspot.com
Ignoring sunlight
Fix this by observing the site through the day and matching crops to the light they need.
Making beds too wide
Fix this by checking whether you can reach the center from the paths without stepping into the bed.
Skipping soil tests
Fix this by testing the soil before adding lime, fertilizer, or large amounts of amendments.
Crowding plants
Fix this by following spacing instructions and allowing for mature plant size.
Overwatering
Fix this by checking root-zone moisture and watching how water moves through the bed.
Using unsuitable soil or compost
Fix this by choosing clean growing materials and investigating contamination risks where needed.
What Should You Do if the Rows Keep Going Crooked?
Stop and reset the line before sowing more seeds. Check that the end stakes are aligned with your measurements and that the string is pulled tight. If the ground is uneven, keep the string as a visual guide and make the furrow carefully without letting bumps pull the tool away from the line. It is easier to correct a row before planting than after seedlings appear.
Recheck measurements
Measure from the same fixed edge rather than estimating each new row by eye.
Use a clear guide
Keep the string visible and avoid moving the stakes while marking the row.
How to Keep Your Garden Straight as It Grows
A neat garden needs small checks throughout the growing season. Plants grow at different speeds, paths collect weeds, and heavy rain can move loose soil. Spend a little time checking bed edges and row spacing so the layout stays useful as plants mature.
Remove weeds while they are small, guide climbing plants onto their supports, and trim only when the crop or ornamental plant benefits from it. Avoid cutting healthy growth just to force every plant into a rigid shape. A practical layout should help plants grow well, not make routine care harder.
Keep a basic record of what you plant and where it grows. Write down the variety, planting date, and any issues with pests, moisture, or growth. This record helps you decide what to change next season and can make crop rotation easier for vegetables that are affected by the same soil-borne pests or diseases.
Source: gardenary.com
Check bed edges
Restore clear boundaries when soil or mulch spreads onto the paths.
Keep paths clear
Remove weeds and loose items that make walking or carrying tools harder.
Support tall crops
Secure plants that need cages, stakes, or trellises before they become difficult to manage.
Record problems
Note areas that stay wet, crops that struggle, and spots that receive less sun.
Does a Straight Garden Need Crop Rotation?
Straight rows do not require crop rotation, but rotation can help in vegetable gardens. Growing the same crop family in the same soil year after year can allow some pests and diseases to build up. When space allows, change where related crops grow and follow local recommendations for rotation intervals. In very small gardens, crop choice, healthy transplants, sanitation, and soil care also matter.
Track plant families
Record where related crops grew so you can plan future beds more carefully.
Adapt to small spaces
Use the best rotation you can manage and choose crops suited to the space available.
A Simple Checklist Before You Plant
Use this final check before sowing seeds or moving plants into the garden. It helps catch layout problems while the soil is still easy to adjust. You do not need every detail to be perfect, but the main growing conditions and access routes should be ready.
Source: wainhomes.co.uk
Site selected
The area receives suitable light and has a workable drainage plan.
Measurements checked
Bed edges, paths, and planting rows match the plan.
Ground prepared
Weeds and rubbish have been cleared, and the soil is not too wet to work.
Soil reviewed
Soil test results and the needs of your crops guide any amendments.
Water ready
You can reach the beds and water without creating an unsafe path.
Plant spacing planned
Each crop has room to grow, and taller plants will not block shorter sun-loving crops.
Local timing checked
Planting dates fit your region, crop type, and current weather.
What Does a Successful Setup Look Like?
A well-set garden has clear edges, stable paths, suitable growing conditions, and rows or planting blocks that match the plan. Water reaches the roots without washing soil away, and you can tend each crop without stepping on the growing area. As seedlings emerge, the rows remain easy to identify and plants have enough room to develop.
Easy to reach
You can reach the plants for routine care and harvest.
Easy to inspect
You can spot weeds, pests, damaged leaves, and dry soil without much trouble.
Ready to adjust
The layout leaves room to learn from the first season and make useful changes later.
Frequently Asked Questions
Q
How do I make my new garden straight?
Measure the garden area, mark the corners with stakes, and stretch string between them. Use the string to guide straight bed edges and planting rows. Check the measurements before digging, and leave enough room for paths and mature plants.
Q
What is the easiest layout for a beginner garden?
A simple rectangular bed with clear paths is often easy to plan and maintain. Choose a size you can reach from the sides without stepping into the soil. Start with a few crops that suit your climate, sunlight, and available time.
Q
Do I need to level the whole garden before planting?
No. You usually need a suitable, stable growing surface rather than a perfectly flat yard. Smooth small bumps in the bed and address poor drainage, but do not make major changes to a steep slope without suitable advice.
Q
How wide should garden beds be?
Bed width depends on whether you can reach the center from the paths. Many gardeners choose beds around 3 to 4 feet wide when they can access both sides, but this is only a guide. Make beds narrower if your reach, mobility, or available space calls for it.
Q
Should I add fertilizer when setting up a new garden?
Do not add fertilizer by default. Test the soil and check the needs of the crops you plan to grow. Too much fertilizer or the wrong amendment can harm plants or create nutrient problems. Follow test recommendations and local growing guidance.
Q
Can I set up a garden directly over grass?
Yes, in some cases. You can remove the turf or use a suitable no-dig method with cardboard and clean organic material. Persistent weeds may need extra attention, and the finished bed must have enough suitable growing material for the crops you choose.
Q
When should I set up my new garden?
You can plan and prepare a garden before the main planting season, but the best time to plant depends on your region and crop. Check local frost dates, soil conditions, and planting calendars. Avoid digging or working soil when it is saturated.
✦ Wrapping Up
Conclusion
Setting my new garden straight starts with a clear plan, not a pile of tools or a rush to plant. Choose a suitable site, measure the area, mark the beds, and prepare the soil with care. Straight rows can make a garden easier to manage, but healthy plants and safe access matter more than perfect lines.
Keep the first layout simple and adjust it as you learn how the site handles sun, rain, and plant growth. Use local planting advice, test soil before adding amendments, and give each crop enough room. A garden that is easy to reach and care for is more useful than one that only looks neat on planting day.
💡 Key Takeaway
Before planting, spend one session measuring the garden and marking the bed edges with stakes and string. Check sunlight and drainage, confirm the soil is ready to work, and use crop-specific spacing guidance. Once the layout works on the ground, prepare the beds and plant at the right time for your region.