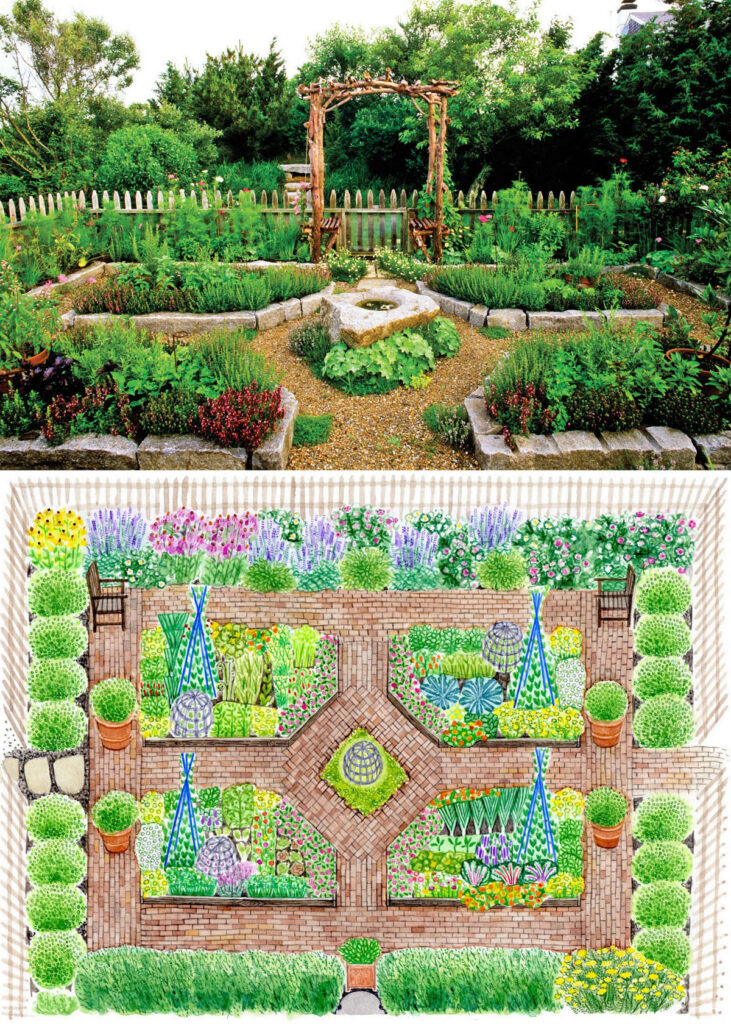
A good garden layout puts plants where they get enough sun, water, space, and room to grow. Plan your beds, paths, and crop spacing before you plant, then adjust the design to fit your yard and local growing season.
A useful garden layout starts with the space you have, not the number of plants you want. In the United States, a garden in sunny Texas has different needs from one in cool Maine or a shaded yard in the Pacific Northwest. Your local climate, soil, frost dates, and summer heat all affect what you can grow and where each crop should go.
The easiest way to grow a garden is to draw a simple plan first. Mark the sunny areas, water source, paths, and planting beds. Then choose crops that suit your space and place tall plants where they will not shade smaller ones. This approach can help new gardeners avoid crowded beds, wasted water, and hard-to-reach crops. You do not need a large yard or costly tools to get started.
Source: thumbs.dreamstime.com
1. Choose the Best Place for Your Garden
The best garden site gives your plants the light, soil, water, and growing conditions they need. Before you mark out a bed, spend a day checking how sunlight moves across your yard. A spot that looks bright in the morning may sit in shade for much of the afternoon.
Many common fruiting crops, such as tomatoes, peppers, cucumbers, and squash, grow best with about six to eight hours of direct sun each day. Leafy crops, including lettuce and spinach, can often manage with less sun, especially when summers are hot. Check the needs of each crop before deciding where to plant it.
Look at the ground after heavy rain, too. A low spot that stays wet can harm roots, while a windy corner may dry out plants and damage tall stems. If your soil drains poorly, a raised bed or another growing method may help.
Source: i.pinimg.com
Check sunlight
Track direct sun in the morning, midday, and afternoon. Record which areas receive the most light.
Check water access
Choose a site where a hose or watering can can reach without crossing delicate plants.
Check soil and drainage
Avoid spots that stay soggy or have roots and rocks that make planting difficult. Consider a soil test before adding major amendments.
Check nearby hazards
Keep the garden clear of contaminated soil, unsafe runoff, and places where pets may damage young plants.
How Much Sun Does a Vegetable Garden Need?
The right amount of sun depends on the crop. Tomatoes, beans, squash, and peppers usually need a sunny site to produce well. Lettuce, arugula, and some herbs can tolerate partial shade, which may be useful in a hot summer climate.
If trees or buildings cast shadows across the yard, map those shadows before planting. Remember that the sun’s path changes with the seasons. A site that is sunny in spring may receive less light when nearby trees fill out.
Full-sun crops
Reserve your brightest beds for tomatoes, peppers, cucumbers, beans, and other crops that need abundant direct light.
Partial-shade crops
Try leafy greens and other shade-tolerant plants in areas with less direct sun, following each crop’s growing guidance.
2. Pick a Garden Layout That Fits Your Space
A garden layout should match the size of your yard, the crops you plan to grow, and the time you can spend on care. Straight rows suit larger plots, while raised beds can make a small backyard easier to manage. Containers work well on patios, decks, and other areas with limited soil.
Do not assume that more beds will always produce more food. Each bed needs watering, weeding, feeding, and harvesting. A small, well-planned garden may be easier to care for than a large plot that becomes crowded and difficult to reach.
Sketch a few possible designs on paper before you dig. Include the bed sizes, paths, water source, and space for a compost bin or tool storage if needed. A simple drawing can reveal problems before they become hard work.
Source: i.pinimg.com
Traditional rows
Best for larger plots, crops planted in long lines, and gardeners who need room for a wheelbarrow or garden cart.
Raised beds
Useful when you want defined growing areas, controlled soil mixes, and easy access from the sides.
Square-foot or grid planting
Helpful for planning small beds, provided each crop still receives its required spacing and root room.
A flexible option for patios and balconies, as long as the containers have drainage and enough space for mature roots.
A Simple 4-by-4-Foot Raised Bed Plan
A 4-by-4-foot bed offers 16 square feet of growing space. It can suit a beginner who wants to grow a few types of vegetables without taking over the yard. Since you can reach the center from the sides, you usually do not need to step into the bed.
For example, you might plant a small group of leafy greens along one edge, a few bush beans in another area, and herbs in a separate corner. A compact tomato plant may fit if you leave enough space for its mature size and provide support. The final count depends on the crop variety and the spacing listed on its label.
Keep access easy
Place the bed where you can reach every part without stepping on the soil.
Plan mature size
Allow for full-grown leaves, roots, and supports rather than judging space by the size of young seedlings.
Plan Paths Before Building Beds
Paths make it easier to water, weed, and harvest without crushing plants or compacting growing soil. Leave enough room for your body, tools, and any cart you plan to use. The best path width depends on the garden and the way you move through it.
Grass, mulch, gravel, and stepping stones can all work for paths. Choose a surface that drains well and remains easy to walk on after rain. Avoid placing a path so close to a bed that mature plants block it.
Narrow paths
Can save space in small gardens, but must still allow safe access to all beds.
Wide main paths
Help when you carry compost, move a cart, or harvest crops in large baskets.
3. Draw Your Garden Layout Grow a Garden Plan
A garden plan turns a rough idea into a practical planting guide. Start with a simple sketch of the yard, then add the features that will affect plant growth. Use measurements where possible so your beds and paths fit the available space.
Write down the crops you want to grow and estimate how much room each one needs. Seed packets and plant labels often list spacing, planting depth, days to maturity, and other useful details. Use those instructions to check whether your plan can support the number of plants you want.
If you are unsure where to begin, plan just one or two beds for the first season. You can add more space later after you learn how much work watering, weeding, and harvest require.
Source: heartscontentfarmhouse.com
Measure the site
Record the length and width of the growing area, as well as fixed features such as fences, sheds, and trees.
Mark the sunniest zones
Place crops that need full sun in the brightest areas and reserve lower-light spaces for suitable plants.
Add beds and paths
Draw the shape and size of each bed, then leave room to move between them.
Add crop names
Write each crop in its planned space and check its mature size before settling on the design.
Example Layout for a Small Backyard
Imagine a backyard with a sunny rectangular area measuring 12 feet by 16 feet. A possible design uses two raised beds, each 4 feet by 8 feet, with a path between them and access around the outer edges where space allows. The remaining area can hold a water source, a small potting spot, or containers for herbs.
This is a planning example, not a fixed design for every yard. Check the real dimensions before building, and adjust the path width to suit your needs. If a fence shades one bed for much of the day, swap the crop groups so the sun-loving plants get the brighter spot.
Bed one
Use for sun-loving crops such as tomatoes, peppers, or bush beans, depending on spacing and the season.
Bed two
Use for greens, roots, or herbs that match the light and soil conditions in that part of the yard.
Open access area
Keep enough space to water, harvest, and carry supplies without walking through the beds.
4. Arrange Plants by Height, Sunlight, and Growth Habit
Place tall plants where they are least likely to shade smaller crops. In many Northern Hemisphere gardens, the north side of a bed is a useful starting point for tall crops because the sun generally travels across the southern part of the sky. However, the best position can change with your location, the season, and nearby shade.
Use trellises for crops that naturally climb, such as pole beans and many cucumber varieties. A trellis can save ground space and help keep fruit off wet soil. Make sure the support is secure and does not block access to other plants.
Leave enough space between plants for air movement and growth. Crowded foliage can stay damp longer and may make some plant diseases harder to manage. Follow crop-specific spacing advice instead of squeezing extra seedlings into every open gap.
Source: i.pinimg.com
Tall crops
Plan space for corn, pole beans on supports, and other tall plants where their shade will have the least impact.
Medium-height crops
Place crops such as peppers and bush beans where they have enough sun and do not block paths.
Low-growing crops
Use open, sunny edges for suitable greens, radishes, and other compact plants.
Use Vertical Space Without Crowding Plants
Vertical growing makes a small garden more productive when the crops suit it. Pole beans and climbing cucumbers can grow upward on a sturdy trellis rather than spreading across the ground. This leaves more open soil for crops that do not need a support.
Check the expected weight of mature vines and fruit before choosing a support. Secure trellises firmly, especially in windy areas. Do not let climbing plants spread into neighboring beds or block the light needed by nearby crops.
Choose suitable crops
Use climbing varieties for trellises and check the seed packet for growth habit.
Keep harvest access clear
Leave room to reach both sides when possible, and place the support where you can pick fruit without damaging vines.
5. Choose Crops That Match Your Local Growing Season
A useful garden layout includes plants that can grow well in your local climate. The United States has a wide range of growing conditions, so a planting date that works in Florida may fail in Minnesota. Check your local frost dates, seasonal temperatures, and the days to maturity listed for each crop.
Cool-season crops include many types of lettuce, peas, radishes, and spinach. They often grow best in cool weather and may bolt or turn bitter during heat. Warm-season crops such as tomatoes, peppers, beans, and squash generally need warmer soil and protection from frost.
Do not rely on a national calendar alone. Your local cooperative extension service can provide guidance for your county or region. Seed packets and local planting calendars can help you decide when to sow seeds indoors, plant outdoors, or start a second crop.
Source: i.pinimg.com
Spring crops
Consider peas, lettuce, radishes, and other cool-season vegetables when local soil and weather conditions allow.
Summer crops
Plan space for heat-loving crops after the local risk of frost has passed.
Fall crops
Leave room for another round of cool-season crops if there is enough time before hard frost.
Long-season crops
Check the expected maturity period and your local frost-free window before giving them a large share of the garden.
Plan for Succession Planting
Succession planting means sowing a crop in stages or planting a new crop after an earlier one finishes. It helps keep a garden useful through more of the growing season. For example, you might sow radishes in small batches rather than planting every seed on the same day.
Leave a note on your garden plan showing when each bed becomes free. After harvesting one crop, check whether the next crop suits the remaining weather and soil conditions. Avoid planting a new crop too late for it to mature before frost or extreme heat.
Stagger quick crops
Sow small batches of suitable fast-growing crops at intervals recommended for your climate and variety.
Reuse open beds
Replace harvested plants with crops that fit the next part of the local growing season.
6. Group Plants by Water, Soil, and Care Needs
Grouping crops with similar care needs makes garden work easier. Plants that need frequent water are simpler to manage when they share a bed or watering zone. Crops with different moisture needs can be harder to care for when they grow side by side.
Most vegetables grow best in soil that drains well and contains enough organic matter. A soil test can help you learn whether the garden needs changes to its pH or nutrient levels. Avoid adding lime, fertilizer, or other amendments without a clear reason, because too much of a good thing can harm plant growth.
Use mulch where appropriate to help limit weeds and reduce moisture loss. Keep mulch away from direct contact with plant stems, and follow crop-specific advice. Water the root zone when possible, since frequent wetting of leaves can encourage disease in some conditions.
Source: i.pinimg.com
Moisture-loving crops
Group plants with similar water needs and monitor the soil so roots do not stay too wet.
Drought-tolerant herbs
Give herbs such as rosemary a site with suitable drainage rather than placing them in a bed that stays constantly moist.
Soil preparation
Use a soil test to guide amendments and avoid applying nutrients without a demonstrated need.
Should You Use Companion Planting?
Companion planting means growing different plants near one another for practical reasons, such as making good use of space or attracting helpful insects. Some combinations work well because their growth habits complement each other. Others are based on claims that may not have strong evidence for every garden or climate.
You can plant flowers near vegetables to provide food for pollinators and other beneficial insects. You can also grow quick crops between slower-growing plants when their light, water, and space needs allow it. Do not assume that every popular companion planting chart guarantees better growth or fewer pests.
Use compatible growth habits
Pair compact crops with suitable larger crops only when both receive enough light, water, and root space.
Add flowering plants
Choose flowers suited to your region and growing conditions to provide nectar and pollen for beneficial insects.
Check plant-specific needs
Confirm that the proposed plants have compatible soil, moisture, and spacing requirements before combining them.
7. Avoid Common Garden Layout Mistakes
The most common layout problems are overcrowding, poor access, too little sun, and a watering plan that does not match the plants. These issues can slow growth and make daily care more work than it needs to be. A few checks before planting can prevent many of them.
First, check the mature width and height of each crop. Small seedlings can make a bed look empty, but they may spread far more than expected. Resist the urge to fill every gap if doing so will block airflow or limit root space.
Next, walk through the planned garden as if you were watering or harvesting. Make sure you can reach the back of each bed and carry supplies without stepping on growing soil. If the design feels awkward on paper, it will probably feel awkward in real life.
Source: gardenersmag.com
Planting too close
Use the spacing guidance for the exact crop variety and thin seedlings when needed.
Ignoring shade
Check sun patterns and move sun-loving crops away from persistent shade.
Poor drainage
Check the soil after rain and address drainage problems before planting crops that cannot tolerate wet roots.
No room to harvest
Keep paths and bed edges clear so you can reach mature crops without breaking stems.
Growing too much at once
Start with a manageable number of crops and expand when you know how much care they require.
How to Fix a Garden That Feels Too Crowded
If plants overlap heavily, block paths, or struggle for light, start by checking which crops have exceeded their expected size. Thin crowded seedlings and harvest mature crops when ready. For established plants, remove only the growth that is safe to prune for that crop rather than cutting plants back at random.
If crowding happens every season, update the layout before the next planting. Reduce the number of plants, move sprawling crops to a separate area, or add a trellis for suitable climbing varieties. Do not force a crop into a bed that cannot provide its mature space requirements.
Thin seedlings
Follow the seed packet guidance so remaining plants have enough room to grow.
Move sprawling crops
Reserve more space for crops such as pumpkins and winter squash, or select compact varieties suited to small gardens.
8. Keep Your Garden Plan Useful All Season
A garden layout should change when the plants, weather, and your needs change. Keep a copy of the plan and mark what you actually planted, when you planted it, and how the crops grew. Those notes can help you make better choices next season.
Record which beds dried out quickly, where weeds grew most, and which plants were hard to reach. Note crops that produced more food than your household could use, too. The aim is not to fill every inch of soil, but to grow a useful amount of food with the time and space you have.
At the end of the season, remove diseased plant material according to local guidance and clear away spent crops. Healthy plant waste may be suitable for composting, but plants affected by serious disease or pests may need a different disposal method. Clean and store garden tools, then review your notes before drawing the next plan.
Track planting dates
Write down sowing and transplanting dates so you can compare them with local weather and harvest timing.
Record harvest results
Note which crops produced enough food and which ones took more space or care than expected.
Update the layout
Change bed assignments, path access, and crop choices based on the problems you observed.
Use Crop Rotation When Planning Next Season
Crop rotation means changing where related crop groups grow from one season to the next. It can help reduce the buildup of some crop-specific pests and diseases, though the benefits depend on the crop, pathogen, and rotation plan.
For a small garden, write down where you grew tomatoes, peppers, beans, peas, cabbage-family crops, and other vegetables. Move crop groups when space allows, and avoid planting the same crop family in the same bed year after year when soil-borne problems are a concern.
Keep simple records
Use a notebook or a basic garden map to record crop families and bed locations.
Rotate where practical
Move crop families to other beds when possible, while accounting for perennial plants and limited space.
Frequently Asked Questions
Q
What Is the Best Layout for a Beginner Vegetable Garden?
A small raised bed or a simple garden with short rows is often a good place to start. Choose a sunny site, leave enough room for paths, and plant a few crops that suit your local climate. A simple design is easier to water, weed, and adjust as you learn.
Q
How Much Space Do I Need to Grow a Garden?
You can grow a garden in a few containers, a small raised bed, or a larger backyard plot. The space you need depends on the crops, their mature size, and how much food you want to harvest. Start with the space you can care for consistently rather than planting more than you can manage.
Q
Should Garden Beds Run North to South or East to West?
The best direction depends on the site, the season, and the height of the crops. In many Northern Hemisphere gardens, placing tall crops on the north side can help reduce shade on shorter plants. Bed direction matters less when the site has strong shade from buildings or trees, so check actual sun patterns before deciding.
Q
How Far Apart Should Vegetables Be Planted?
Spacing varies by crop and variety. A tomato plant needs a different amount of room from a radish or a leafy green. Follow the spacing on the seed packet or plant label, and account for supports, mature leaves, and access for harvesting.
Q
Can I Grow Vegetables in a Shady Yard?
Yes, some vegetables can grow in partial shade, especially leafy greens and certain cool-season crops. However, fruiting plants such as tomatoes and peppers usually need more direct sunlight to produce well. Measure the available light and choose crops that match it rather than expecting every vegetable to thrive in shade.
Q
When Should I Start Planning My Garden?
Start planning before your local planting season begins. Use local frost dates, soil conditions, and seed packet guidance to decide when to sow seeds or transplant seedlings. You can also plan a fall garden after checking how much growing time remains before cold weather arrives.
✦ Wrapping Up
Conclusion
A useful garden layout begins with sunlight, soil, water, and room to move. Choose a design that fits your yard, group crops by their needs, and leave enough space for mature plants. These simple choices can make growing vegetables easier and help you avoid many common problems.
You do not need to plan a huge garden on the first try. Start with one or two beds, choose crops that suit your local growing season, and keep notes as the plants grow. Your next layout can improve on what worked and fix what did not.
💡 Key Takeaway
Measure your growing space today, track its sunlight, and sketch one small garden bed with clear paths and crop spacing before you plant.